Admitting a student and managing their record
Admit a new student through the eight-step form, then keep their personal, academic, guardian, and health details up to date.
Admitting a student creates the record everything else in FEMS hangs off: fees, attendance, exam marks, transport, and library. This page walks the eight-step admission form, then covers editing a record afterwards and changing a student's status.
Prerequisites
You need Student Record access. You also need your academic structure in place first: the campus, class, section, and shift the student is joining must already exist, and your institution needs a current academic year. Without those, the form cannot place the student.
Starting an admission
Go to Student > Student Record and click Add New Student.
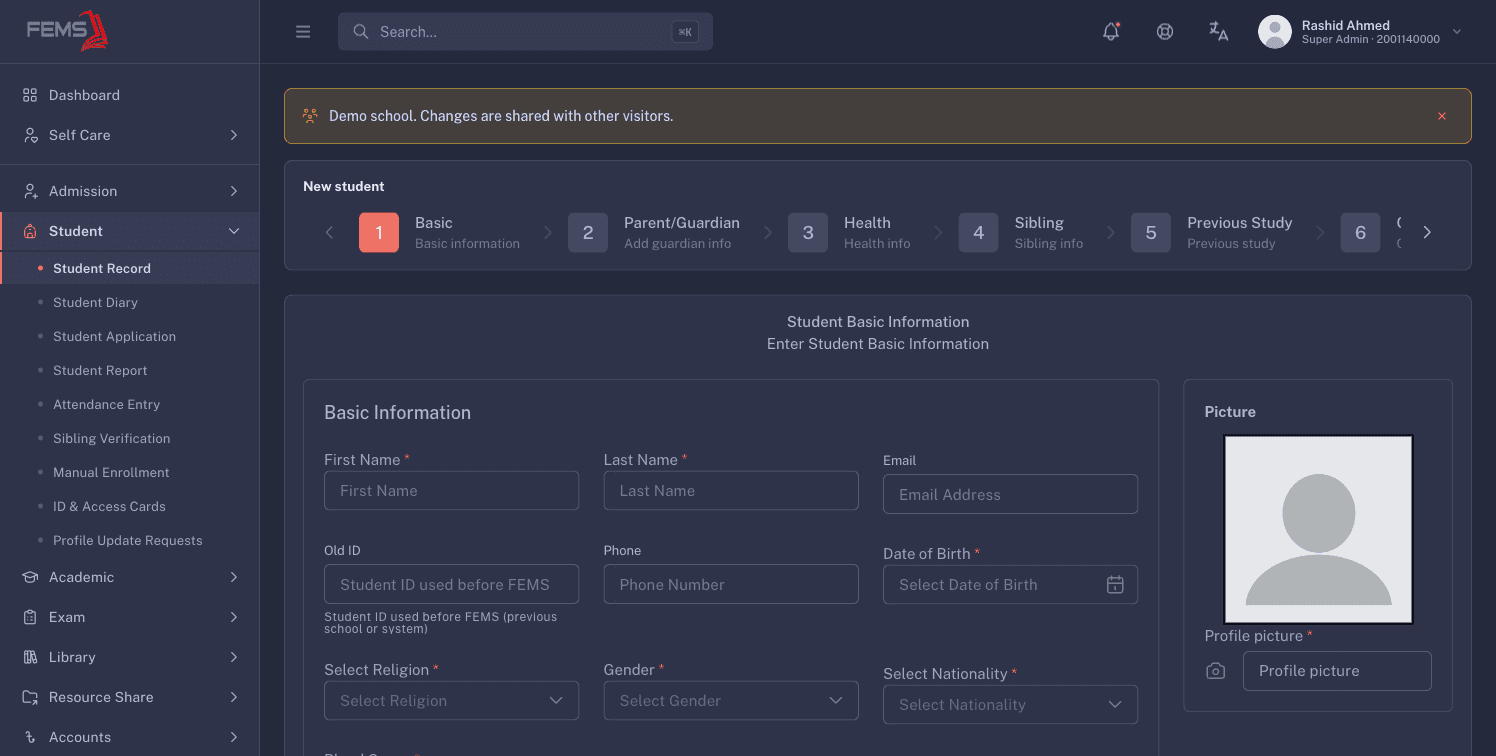
The form runs in eight numbered steps. Each step ends with Save & Next, and you can use Previous to go back. Required fields carry a red asterisk.
You don't type a Student ID. FEMS generates a ten-digit one when the record is created, built from your campus and the academic year plus a running serial number.
Step 1: Basic
The longest step. It has several sections:
- Basic Information: First Name, Last Name, Email, Old ID, Phone, Date of Birth, Religion, Gender, Nationality, Blood Group.
- Picture: the student's photo. Keep it under 2 MB.
- Academic Information: Branch, Class, Group, Shift, Section, and Roll No.
- Present Address: Address 1, Address 2, Division, District, Thana/Post.
- Permanent Address: the same fields, with a Permanent Address same as Present Address checkbox that copies them across.
- Feedback: how the family heard about the school and what they expect from it.
Two fields deserve a note:
Old ID is the identifier the student arrived with, from a previous school or an older system. Leave it blank if there isn't one. Never invent a value. It becomes a search key later, so it is worth entering when you have it.
Roll No offers the roll numbers still free in that class and section, worked out from the room's configured capacity. The list is a suggestion, not a rule: FEMS does not stop you assigning a roll number another student already has. Pick from the offered list unless you have a reason not to.
Date of birth has to put the student between 3 and 25 years old. A future date, or an age outside that range, is rejected.
Step 2: Parent/Guardian
Add the people responsible for the student. Add New Parent opens the Add Parent/Guardian dialog: First Name, Last Name, Mobile No., Telephone, Address, Relation, Email, Nationality, Profession, Yearly Income, Organization, Education, Designation.
Add each guardian in turn. They appear in a table you can edit or delete from.
Below the table, Emergency & SMS Contact Information picks which of those guardians is the Emergency Contact Person and which is the SMS Contact Person. The SMS contact is the mobile number FEMS texts for this student, including absence alerts and fee reminders, so set it deliberately rather than leaving the default.
Step 3: Health
Height in cm, Weight in KG, then three yes/no questions: Physical Disability, Allergy Problem, and Games/Sports to Avoid. Answering Yes opens a box for details. Fill those in properly. This is what a teacher or the school nurse reads in an emergency.
Step 4: Sibling
Search for a brother or sister already enrolled and click Add Sibling. The pairing lands in Siblings Request Lists with a status, and stays there until someone approves it.
FEMS does not check that the two students share a guardian before accepting the claim. That check happens later, by hand, in Sibling verification. A wrong pairing is caught by a person, not by the form, so get it right here.
Sibling links matter beyond the family tree: your school may run a sibling concession, and the fee discount follows the approved link.
Step 5: Previous Study
Previous School Name, Telephone No., Email, Country of Previous Institution, Annual Assesment/Result, and Address. Skip it for a student who has never been to school before.
Step 6: Course Selection
Pick the academic year, review the Class Subjects the class takes automatically, then choose any Optional Subjects and a Fourth Subject where your school offers them.
Step 7: Transport
If the family wants school transport, Add Transport Request opens a dialog for Route, Trip Way, and Total Amount. This raises a request; the Transport module turns it into a billed route assignment.
Step 8: Action
Set the student's starting state. Select Status offers Active, Suspended, or DeActive, and Enter Comments is required: write why. The Comments card below keeps every status change with who made it and when, so this is a permanent audit trail rather than a scratch note.
Click Submit to finish.
What happens when a student is admitted
Creating the record does more than store a form:
- The student gets a ten-digit Student ID.
- They get a FEMS login of their own, so they can use the student portal.
- They get an account in the school's ledger, so fees can be billed and payments recorded against them.
Editing a record afterwards
Open the student from Student Record and use the tabs. Editing happens in a slide-out drawer over the record rather than on a separate page, so you keep your place.
You can update personal details, academic placement, health information, guardians, siblings, previous school, subject choices, and documents. The Document tab has an Add More button for uploading files.
Three edits have consequences worth knowing before you make them.
Moving a student to a different class or section
This is not just a label change:
- Exam marks recorded against the old class and section are switched off, so they stop appearing in the student's results.
- Subject choices that don't exist in the new class are switched off too.
- If your school runs a sibling concession, it is recalculated.
Move a student mid-term only when you mean it, and check their marks and fees afterwards.
Changing the academic year
You can only edit the student's placement for the current academic year. Trying to change a previous year's placement is refused with You can't update previous session.
Deleting a guardian
The mother's record is protected. Attempting to remove her is refused with You can not delete Mother. Other guardians can be removed normally.
Changing a student's status
Use the Action step on the admission form, or the status control on the student's record, to move a student between Active, Suspended, and inactive. A comment is required each time, and every change is kept in the history.
The two screens spell the third option differently: the admission form's Action step says DeActive, and the student record's status control says Deactive. They mean the same thing.
There is no way to delete a student. That is deliberate: attendance, marks, receipts, and ledger entries all point at the record. Make them inactive instead, and their history stays intact.
When something goes wrong
The academic year, class, or section dropdowns are empty. Your institution has no current academic year set, or that class has no sections. An admin needs to configure the academic structure before any student can be admitted.
"The selected branch, class, section, and shift are not configured together." That combination doesn't exist in your academic setup. Check that the section and shift really belong to the class you picked, on the campus you picked.
"The selected section is invalid for this academic session." or "The selected shift is invalid for this class." Same cause, narrower. The individual value is real but doesn't belong to the rest of the combination.
"This attendance device UID is already assigned to another person." The card or device ID you entered is already bound to another student or an employee. Find and clear the old assignment first.
The form saved but no student appeared in the list. Check the Advanced Filter on the Student List first: the list may be scoped to a different class or campus than the one you admitted into. If the student truly isn't there, the save failed quietly and needs a technical look, because the admission form can report success on a failure.
A document upload seemed to work but the file isn't there. Document uploads can report success on failure. Re-open the Document tab and confirm the file is listed. If it isn't, upload it again and raise a ticket if it keeps happening.
Two students have the same roll number. Possible, because the roll list is advisory. Correct one of them from the Academic tab.
You can't re-save an admission. Once a fee invoice exists for that student and academic year, the admission record is locked against re-saving. Edit the individual sections from the student's record instead.
FAQ
Can I choose the Student ID myself? No. FEMS generates it from your campus and academic year. Use Old ID to record whatever identifier the student already had.
Do I have to complete all eight steps in one sitting? The form is built to be saved step by step, so you can add detail later from the student's record. Get Basic and Parent/Guardian right at minimum, since placement and the SMS contact come from those.
Which guardian gets the school's text messages? The one set as SMS Contact Person in step 2. Change it on the Parents tab if the family asks.
A student is leaving. Do I delete them? No. Set them to Deactive on their record, with a comment. Deleting would break their fee, attendance, and exam history. For a transfer certificate, raise it through Student applications.
Why is the photo rejected? Photos need to be under 2 MB. Resize and try again.