HR settings reference
Departments, designations, employment types, leave types, clearance checklists, and exit feedback questions.
The screens under Human Resources > Settings hold the reference lists the rest of the HR module draws on: departments, qualifications, employment types, employee categories, salary templates, application time limits, exit clearance items, and exit interview questions. An HR admin sets these up once and returns to them when the school changes.
Prerequisites
You need an HR admin role with access to the settings screens. Each screen is granted separately, so a role that opens Basic Settings does not automatically open HR Clearance or Application Settings. A general "View Settings" grant on its own does not open any of them.
Viewing and changing are also separate. Your role needs the matching manage-level access before the Add buttons and the row edit and delete icons appear. If a button is missing, it is hidden, not disabled. See Roles and permissions.
Go to Human Resources > Settings, then pick a screen from the list.
How these settings apply
Every screen on this page is institution-wide. A department, employment type, clearance item, or feedback question you add applies to your whole institution, including every campus. There are no per-campus copies of these lists.
The one piece of HR configuration that is campus-specific is Schedule Override, which targets a campus and a department together. See Schedule overrides.
Confirm every save before you move on
Several HR settings screens show a green success message even when nothing was written. A duplicate name or a row that another record still uses can end in a success message with no change saved.
Build one habit: after you save, close the drawer, reload the screen, and check that the value is really in the list. Read the message text too, not just its color. A message like Department already exists. is telling you that nothing new was created.
Basic Settings
Human Resources > Settings > Basic Settings holds five tabs: Department, Educational Qualification, Employment Type, Employee Categories, and Salary Settings. Each tab is its own list with its own search box, Add button, and row actions.
Department
Departments are the backbone of the HR module. A department appears on the employee's employment record, drives the department filter on the attendance report and the attendance dashboard, and is one half of the targeting on a schedule override (the other half is the campus). On the attendance report and dashboard, the Designation filter stays greyed out until you pick a Department first.
To add one:
- Click Add department.
- Enter the Department name, for example Science.
- Enter a Short name, for example SCI. You can search the list by either the name or the short name.
- Tick This is an academic department if this is a teaching department.
- If you mark it academic, choose the School that the drawer reveals.
- Click Add.
You'll see the new department in the list, with Yes or No in the Academic column.
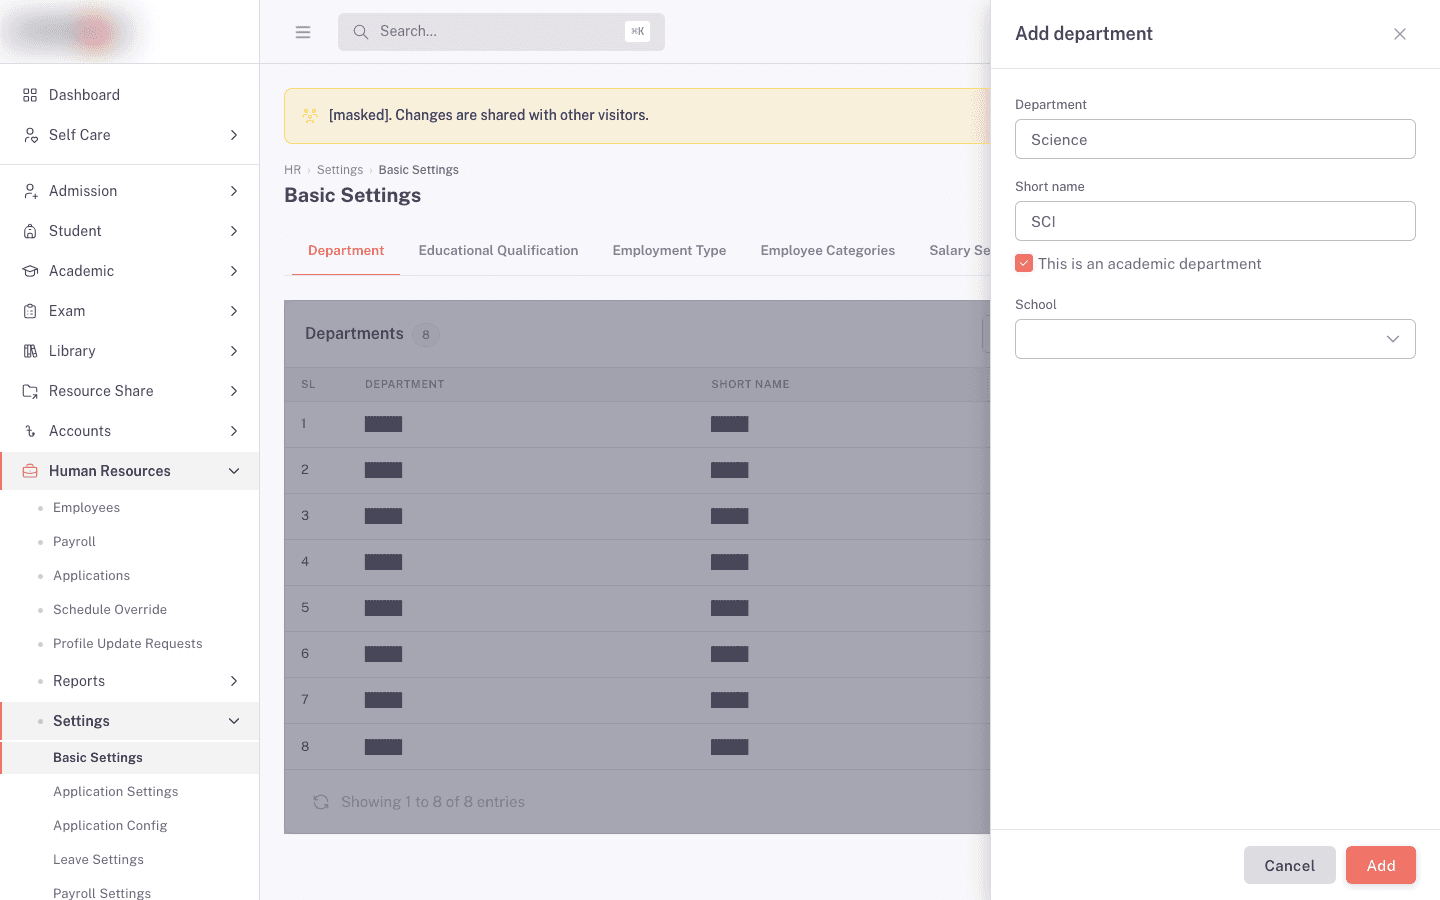
To change one, click the pencil on its row. The drawer opens with the fields filled in.
Two things to know about departments:
- Deleting is really deactivating. The department stops appearing in the list, but it is not erased. If a user role still references the department, the delete is acknowledged and not performed, and the message reads Department delete acknowledged (in use by User Role). Detach the department from that role first, then delete again.
- Renaming can silently do nothing. If another department already has the name you typed, including one you deleted earlier, you get Department already exists. and the old name stays. Pick a different name, or ask an administrator to clear the conflicting deactivated department.
Educational Qualification
This list fills the qualification dropdown on the education section of an employee record. Add every qualification your staff hold, for example Bachelor of Science or Master of Education.
- Click the add button on the Educational Qualification tab.
- Enter the Qualification.
- Enter an Order number.
- Click Add.
When you edit an existing row, the drawer heading reads Edit qualification and the action reads Update.
You cannot delete a qualification that employees still list on their records. The delete reports success and the row stays. Remove the qualification from those employees first.
Employment Type
An employment type classifies how someone is engaged, for example Permanent, Contract, or Part Time. It appears on the employee's employment record, and it is also the list behind the Employment Type dropdown in Salary Settings.
- Click the add button on the Employment Type tab.
- Enter the name in the Employment type field.
- Enter Leave balance as a numeric number of days per year.
- Click Add.
Deleting an employment type that employees are still on reports success but changes nothing. Move those employees to another type first, then delete and reload to confirm.
Employee Categories
A category is a second way to group staff, for example Teaching, Administration, or Support. Enter the Category name and save. The list feeds the category dropdown used when classifying an employee.
As with employment types, a category that employees still use cannot be deleted. The message says it worked; the row stays.
Salary Settings
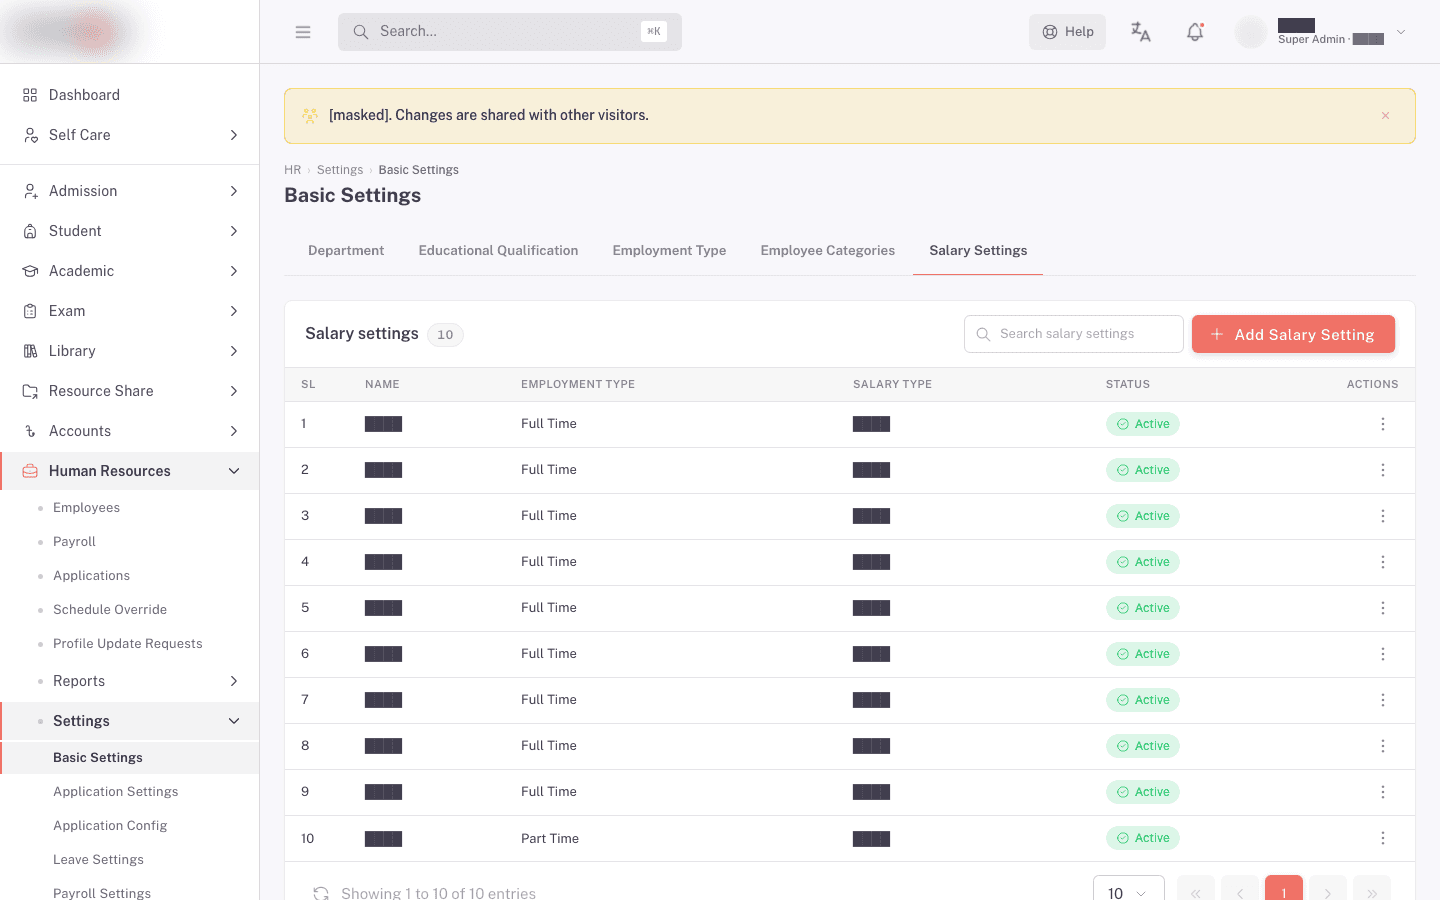
A salary setting is a named salary template tied to an employment type. The table lists Name, Employment Type, Salary Type, and Status.
- Click Add salary setting.
- Enter a Name for the template.
- Pick an Employment Type. The options come from the Employment Type tab.
- Pick a Salary Type: Fixed, Variable, or Commission.
- Tick Active under Status if the template is in use.
- Save.
The row shows an Active or Inactive chip. Deleting opens a confirmation modal titled Delete this salary setting? with the description Payslips already generated with it keep their figures. Confirm with Delete, or cancel.
Two quirks worth knowing:
- Search filters the whole list before pagination. You can search for a row even when it is not on the page currently displayed.
- A red bar at the top with a greyed-out Employment Type dropdown means the employment types failed to load. Open the Employment Type tab to check it loads, then reload the page.
Application Settings
Human Resources > Settings > Application Settings sets the time limits around staff applications. It has three sections: Barrier For Application, Late Arrival, and Early Departure.
Each limit is written on screen as a question with an Enable or Disable switch. Turning a switch on opens its time boxes; leaving it off greys them out and removes that limit entirely. So reading down the page, a switch set to Disable means "no limit of this kind applies".
The table below says which step of the application flow each switch covers.
| Question on screen | What switching it on does |
|---|---|
| Want to add application barrier? | Puts a time limit on submitting an application. |
| Want to add recommendation barrier? | Puts a time limit on the recommendation step. |
| Want to add forward barrier? | Puts a time limit on forwarding an application. |
| Want to add approved forward barrier? | Puts a time limit on forwarding an application that is already approved. |
| Want to add maximum considerable time barrier for application? | Under Late Arrival. Sets how much lateness an application can still cover. |
| Want to add minimum time frame barrier for staying at office? | Under Early Departure. Sets the least time in office before an early departure is allowed. |
Each enabled limit is entered as Hours and Minutes. Some limits also carry an Apply In advance value.
Click Save when you are done, or Cancel to drop the changes. On success you see Application settings saved. If a field is wrong you see Please check the highlighted fields and try again.
Application Config
Human Resources > Settings > Application Config has three tabs: Attendance Application, Leave Application, and Payroll Application. Each one holds the configuration for that kind of staff application.
Leave Settings
Human Resources > Settings > Leave Settings has one tab: Type Setting.
Do not set your leave types up here. The Type Setting tab shows a fixed sample list of leave types with codes, deduction flags, and balances that are built into the screen. They are not your institution's leave types, editing them changes nothing, and there is nothing to save. Your real leave types and the balances behind them are managed elsewhere in the HR module. See Leave and applications.
Who approves applications is set in Role Management, not here. Give a role Approve Attendance Applications to let its members approve late arrival, early departure, and manual attendance applications, and Approve Leave Applications for leave. Everyone holding the permission can work the same queue, so the work does not stop when one person is away. The applicant's line manager can still recommend, but an approver does not have to wait for it.
Payroll Settings
Human Resources > Settings > Payroll Settings currently shows only a page heading. There is nothing to configure on it. It is one of the non-functional HR screens tracked under umbrella issue #2472.
Part of payroll is set up in a different place. Pay periods, payroll assignment, adjustments, and payslips all live under Human Resources > Payroll.
The rest of it has no screen anywhere in the console. Earning heads, deduction heads, payroll groups, and the late-arrival threshold cannot be created or edited from any FEMS screen today. Your FEMS administrator maintains them outside the console, so ask them for the list of heads and groups your school already has, and ask them to set the late-arrival threshold if you want lateness charged. See Payroll setup and Running payroll.
HR Clearance
Human Resources > Settings > HR Clearance opens Exit clearance items. Each item here becomes one line an exiting employee must be signed off on, so the list is usually the set of departments and people who have to release someone: accounts, transport, the reporting manager, and so on.
The first time anyone opens this screen, FEMS creates 11 starter clearance items so you are not beginning from an empty list. Edit them to match how your school actually clears staff.
- Click Add clearance item.
- Enter the clearance Item, for example Library.
- Enter a Description.
- Click Add.
The Clearance items list refreshes and the item appears in the Item column.
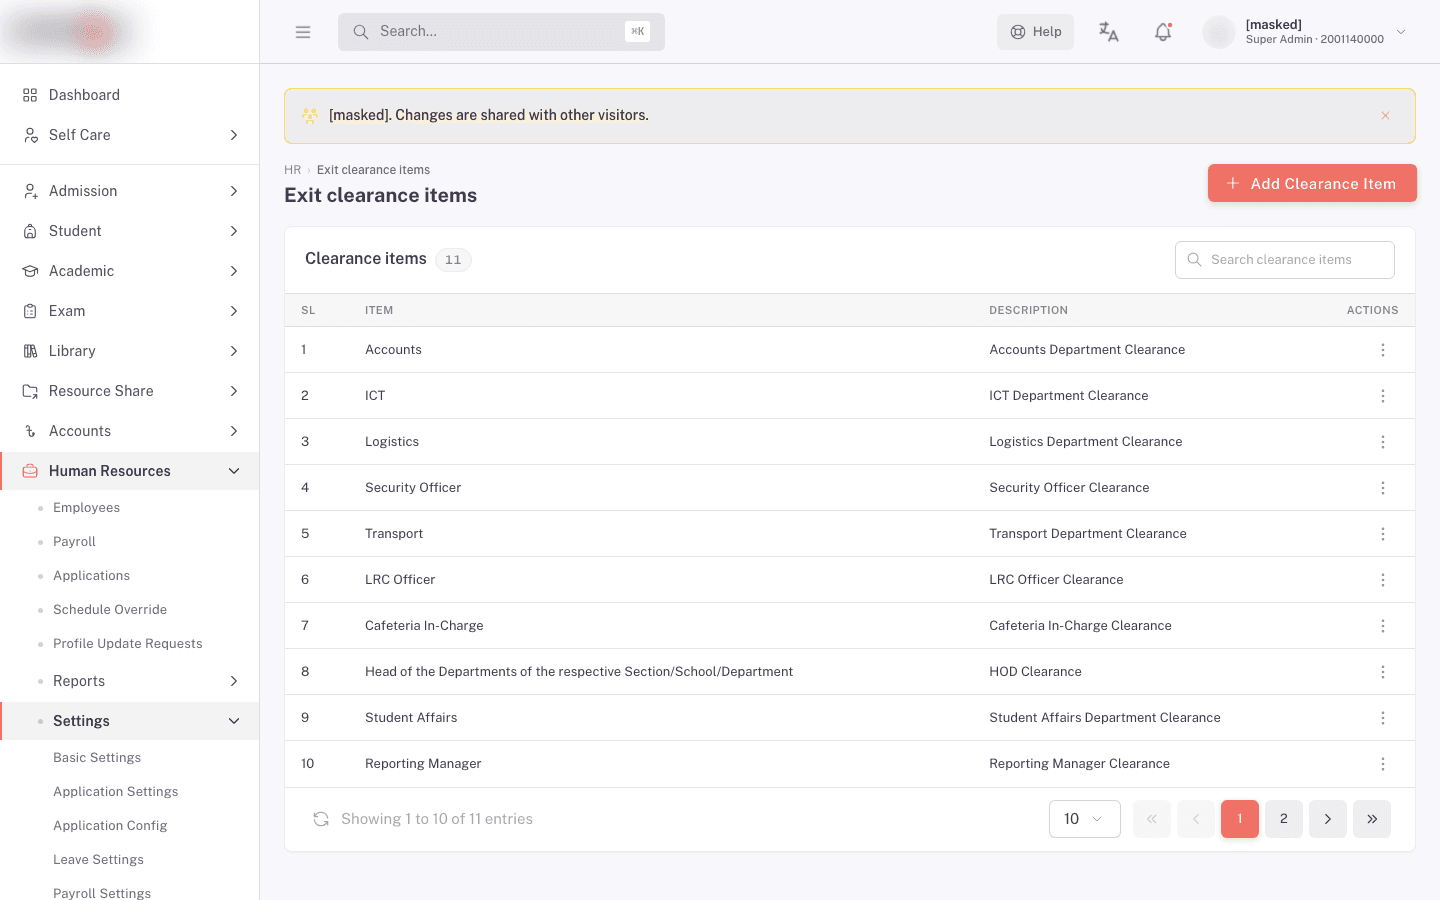
To change an item, click the pencil on its row, edit, and click Update. A successful edit shows Clearance item updated. If saving fails, the form stays open and shows the error so you can correct it.
There is no delete on this screen. If a clearance item is no longer used, rename it or reword its description rather than trying to remove it.
HR Feedback Question
Human Resources > Settings > HR Feedback Question opens Exit feedback questions. Every question here appears on the exit feedback form when an employee leaves, and the answers are stored against that employee's exit record.
The first time anyone opens this screen, FEMS creates a set of starter questions. Read them before your first exit interview. Some of the starter wording names a specific school that is almost certainly not yours, so edit or replace those questions before anyone answers them.
- Click Add question.
- Type the Question. Keep it to 500 characters or fewer.
- Click Add.
You'll see Question added and the question in the list. When you edit an existing question, a successful save shows Question updated.
Notes on this screen:
- The STATUS column shows Active or Inactive, but the form has no status field. New questions are created as Active and there is no way to switch a question off from this screen. To retire a question, delete it.
- CREATED BY shows the login name of the account that added the question, not the person's full name.
- Deleting opens a confirmation modal titled Delete this question?. It is a separate permission from adding and editing. A role can legitimately have Add question and the edit pencil but no trash icon.
- If you delete every question, the starter questions come back the next time the screen loads. Keep at least one of your own.
- If a question does not save, the form stays open and shows The question didn't save. Try again. Correct the field and try again.
FAQ
I got a green success message but my change is not there. What happened? Some of these screens report success for a save that did nothing, such as a duplicate name or a row another record still uses. Reload the screen and check the list every time. Read the message wording too, since Department already exists. and Department delete acknowledged (in use by User Role). are both shown in green.
How do I save an edited department? Open the department drawer, make the change, and click Update.
I deleted a department but it is still in the list. Why? Either a user role still references it, in which case the message says the delete was acknowledged and nothing was removed, or the delete worked and the department is deactivated rather than erased. Detach the department from the role under access control, then delete again and reload.
Does Salary Settings search only the current page? No. Search filters the full list before pagination, so it can find rows that are on later pages.
Do these settings apply to all our campuses? Yes. Every list under Human Resources > Settings is institution-wide. The only HR configuration that targets a single campus is Schedule Override, and it needs both a campus and its departments selected.
My HR officer can open Basic Settings but the Add buttons are missing. Viewing and managing are separate permissions on each screen, and the buttons are hidden rather than disabled when the manage permission is missing. Grant the manage-level access for that specific screen.