Generating monthly payslips
Run payroll factoring in attendance, leave, deductions, and bonuses.
The Payroll screen is where a payroll officer runs the month: open a pay period, generate a payslip for every employee, and check the results before staff see them. This is the page you come back to every month. Read the two defects it carries before your first run, because both change what you can promise staff.
Prerequisites
Your role needs access to Payroll in Human Resources. Creating a pay period, editing one, running the generation, managing adjustments, and printing payslips are all separate accesses, so you may see the screen without seeing every button. Ask your system administrator if a button described here is missing for you.
Go to Human Resources > Payroll.
Before your first run, finish the setup described in Setting up payroll. An employee with no salary structure gets no payslip, and payroll gives you no warning about it.
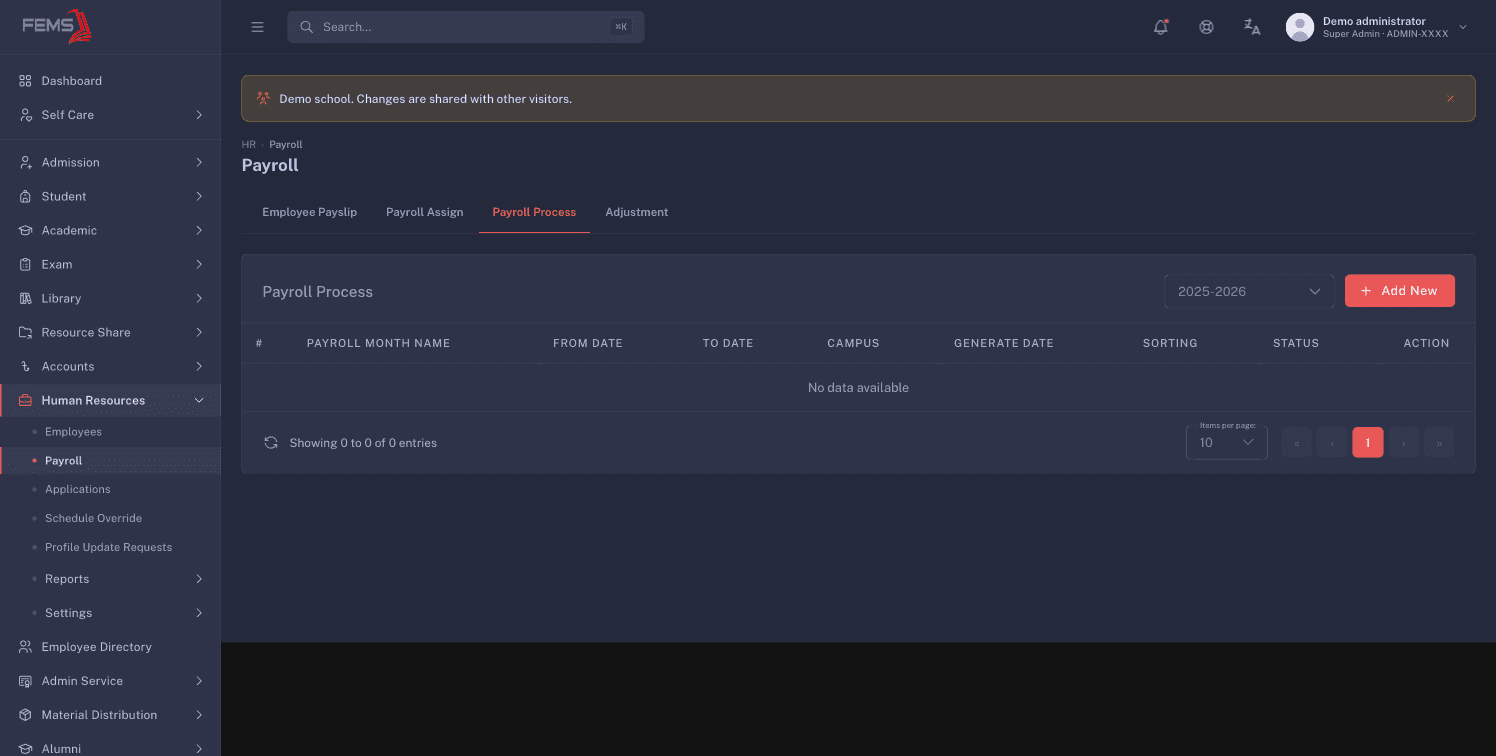
The four tabs
| Tab | What it is for |
|---|---|
| Employee Payslip | Meant to list the generated payslips. It does not show the period you just generated. Step 4 explains why. |
| Payroll Assign | Who is on payroll, on which group, at which gross. Setup lives here. |
| Payroll Process | The pay periods. You create the month here and start generation from here. |
| Adjustment | One-off amounts for a period, such as a festival bonus. They are recorded, but they do not change any payslip today. |
Most months the work happens on the Payroll Process tab. Check the result from the employee's side afterwards rather than on the Employee Payslip tab. Step 4 below explains why.
The monthly sequence
1. Create or select the pay period
A pay period is one month you are going to pay. It carries the dates you are paying for, the campuses it covers, and where it is in the pipeline. One period covers one date range in one academic session.
On the Payroll Process tab, pick the session in Select Session, then click Add New. The New Payroll drawer opens on the right.
| Field | What to enter |
|---|---|
| Payroll Name | The month, for example June 2025. At least 2 characters. |
| Sorting | The position in the list, from 1 to 999. |
| From Date | The first day you are paying for. Prefilled to the 1st of the current month. |
| To Date | The last day you are paying for. Prefilled to the last day of the current month. |
| Campus | The campuses this run covers. At least one. Only employees at these campuses get a payslip. |
| Payroll | A radio with Upcoming and Current. Defaults to Upcoming. |
Click Submit. You get a success message and the drawer closes, and the new period appears in the table.
Pick Current if you intend to generate this month. Only a period marked Current is picked up by the generation. A period left as Upcoming is skipped by the nightly run indefinitely.
An Upcoming row also carries no Process and no Reprocess button, only the eye icon and the edit pencil, so there is no way to generate from that state. If you already created the period as Upcoming, click the edit pencil on the row, set the Payroll radio to Current, and save. Process then appears on the row.
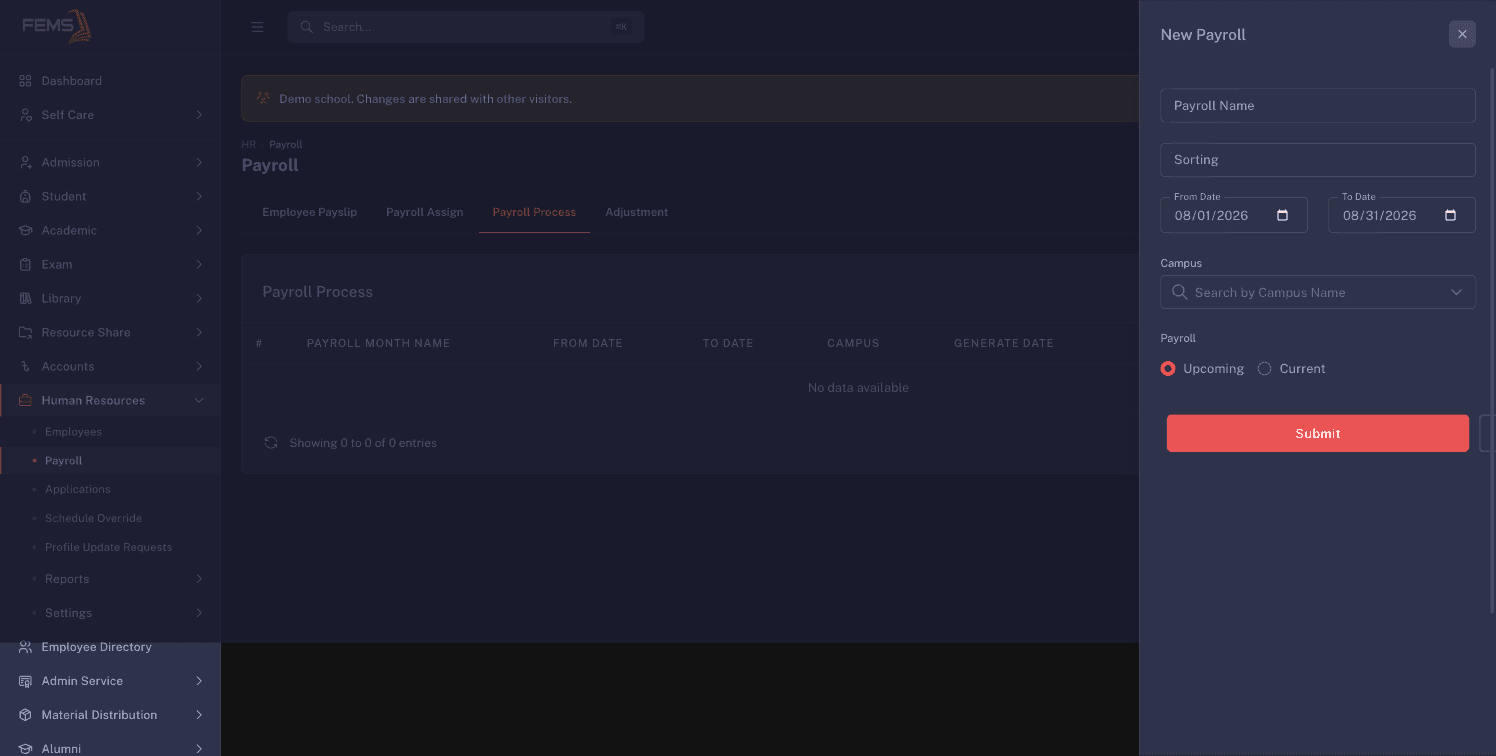
Check the campuses on the saved row. The Campus list in this drawer is a fixed list rather than your school's own campuses, so it can store the wrong campuses. Generation only reaches employees at the campuses stored on the period, so a wrong campus means missing payslips or none at all. After saving, click the eye icon on the row to open Payroll Details and confirm the CAMPUS value is right before you process.
What makes a period the current one
The Payroll radio set to Current is what marks a period for generation. Upcoming does not.
The Employee Payslip tab does not show the period you just generated. That tab is wired to one period at a time, and the period it picks is always one whose Payroll setting is Upcoming. Generation only ever runs on a period set to Current, and Reprocess switches the period to Current as it starts. So a period that has payslips is never the period the tab is showing. The Payslip Month filter does not get you out of it either. It narrows within that one anchored period rather than choosing a different one, so picking another month returns nothing at all.
Check a run from the employee's side instead. Staff see their own payslip under Self Care > Salary & Payslips, and that view does not use the anchor. Do not reprocess again because the tab looks empty. This is a known defect, tracked as issue #2479. Report the empty tab to your FEMS administrator so it is on record for your school.
If the dates already exist
A second period with the same date range in the same session is refused. On screen you still get Payroll process created successfully!, because the drawer shows that message whatever the answer was. The confirmation is not proof, and the give-away is that no new row appears in the table.
So if you submit New Payroll and no new row appears, do not submit again. Look down the list for a period already covering those dates and use it.
2. Settle the one-off amounts
Adjustments do not reach the payslip today, so nothing you enter on the Adjustment tab changes a figure. Pay festival bonuses, allowances and fines outside FEMS. Record them on the tab only if you want the amounts listed in one place. The Adjustments section below covers the form and the defect.
3. Generate the payslips
Row actions on the Payroll Process table depend on the period's status:
- Process appears when the status is Current.
- Reprocess appears when the status is Ready to Generate or Generated.
Both open the same Update Info drawer. Fill it in:
| Field | Notes |
|---|---|
| Generated On | Date and time. Required. |
| Application Deadline | Must be after Generated On. |
| Recommendation Deadline | Must be after Application Deadline. |
| Will Attendance be Calculated? | Yes or No. |
| Will Late be Calculated? | Yes or No. Disabled when attendance is No. |
| Acceptable Delay (Minutes) | A number from 0 to 255. |
| Salary deduct on late arrival days | Defaults to 3. |
| Notes | Free text, up to 1000 characters. |
Click Submit.
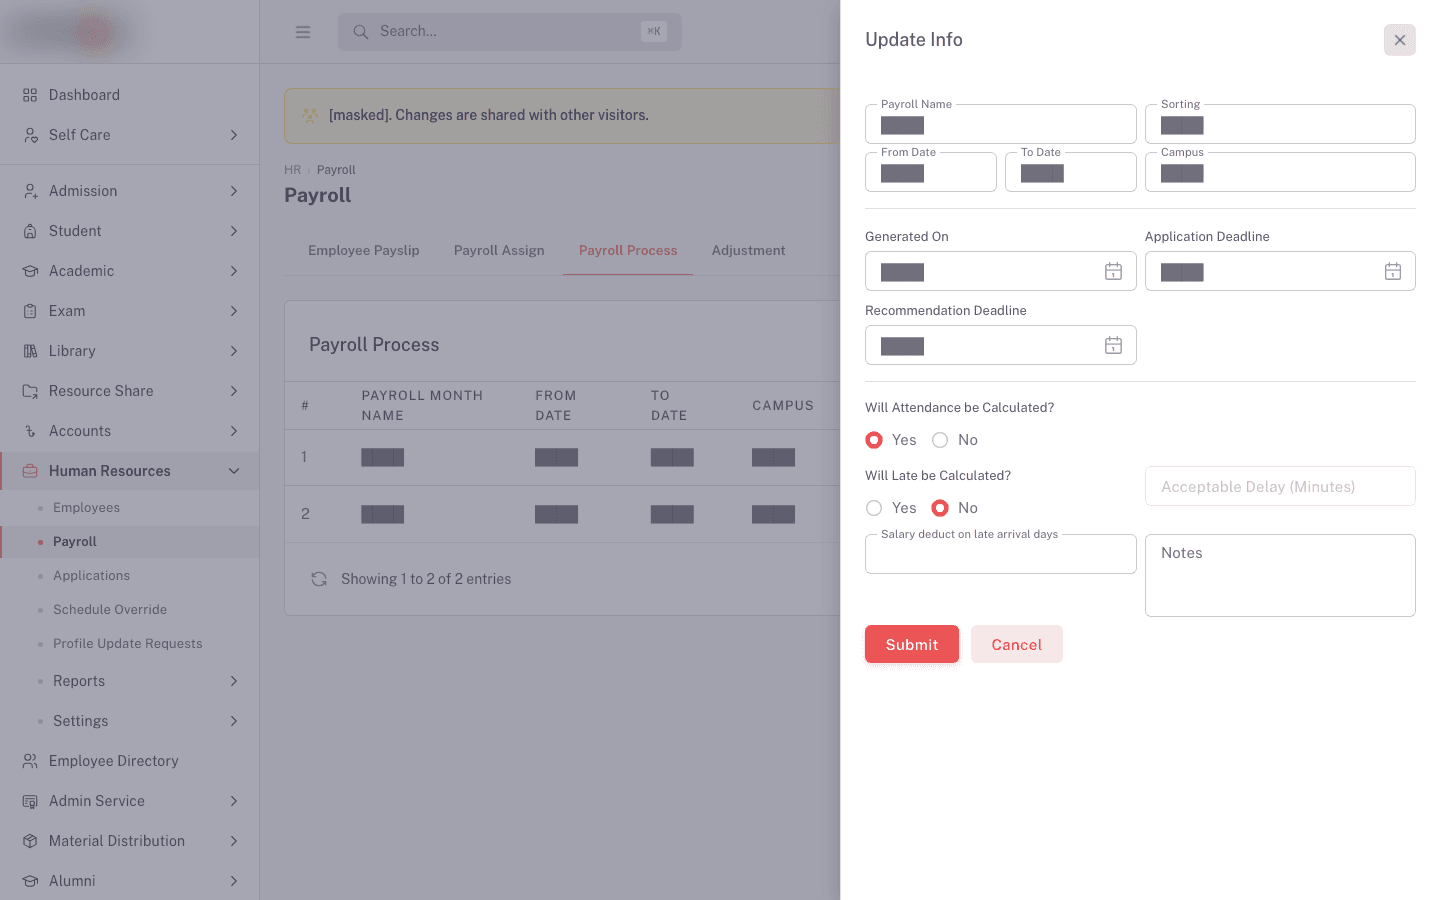
The last four fields in that drawer do not change the calculation today. They are saved with the period, but the payslip figures come from the institution-wide late-arrival threshold instead, and turning Will Attendance be Calculated? off does not stop absence or late deductions. See Setting up payroll.
Now the important difference between the two buttons:
| Button | What it does |
|---|---|
| Process | Marks the period Ready to Generate. It does not produce any payslip at that moment. Generation happens on the nightly run at 02:00. |
| Reprocess | Saves the same information, then starts generation straight away. It also sets the period to Current as it starts. |
So Reprocess is the only button that generates payslips on demand, and only one of the two buttons shows on a row at a time. A period you have just created reads Current and offers Process alone. Click Process first, and the row moves to Ready to Generate with Reprocess now on it. That is two passes through the same drawer for a same-day run. Stop after Process if you are happy to wait for the overnight run.
Generation runs one employee at a time in the background, across every campus on the period. Payslips do not appear the instant you click. There is no per-employee generate button and no progress bar. Give it a few minutes, then check one employee under Self Care > Salary & Payslips.
4. Review the run
Review the run from the employee's side, not from the Employee Payslip tab. As described above, that tab is anchored to a period that generation never runs on, so it stays empty for the month you just produced. Open two or three people under Self Care > Salary & Payslips and read their payslips before staff do.
The rest of this section describes the Employee Payslip tab for the case where it does list rows.
Filter with Campus, Department, Employee Category, Designation and Payslip Month, or type into the search box, which matches employee ID, name, department, designation, and campus. The three location filters cascade: Department stays disabled until you pick a Campus, and Designation stays disabled until you pick a Department.
Columns: EMP ID, NAME, MONTH, CAMPUS, DEPT, DESIGNATION, GROSS, OTHER, DEDUCTION, EARNING, NET PAY, ABS, LATE, STATUS.
| Column | What it holds |
|---|---|
| GROSS | The employee's assigned gross. |
| OTHER | One-off additions. Always zero today, because no adjustment reaches the payslip. |
| DEDUCTION | Absence, unpaid leave, and late deductions added together. |
| EARNING | Gross plus other. |
| NET PAY | What the payslip settles on. |
| ABS | Absent days counted for the period. |
| LATE | Unapproved late marks counted for the period. |
Scan ABS and NET PAY first. A column of large absent counts, or net pay near zero across the board, almost always means attendance for the period was never approved rather than that everyone stayed home.
The STATUS column reads Unpaid on every row, and it always will. There is nowhere for a paid state to be stored against a payslip, so no row ever reads anything else. Treat that column as decoration and keep your record of who has been paid outside FEMS.
5. Reprocess when something changes
Reprocessing recalculates the payslip for every employee on the period and overwrites the previous figures. It does not create duplicate payslips, and the earning and deduction lines are rewritten from scratch, so running it after fixing attendance or approving leave is the normal repair.
Reprocess after any of these:
- Attendance was corrected or approved after the run.
- A leave application was approved after the run.
- Someone's salary structure was assigned or changed after the run.
A second reprocess is only dropped while the first one is still running. Each employee's generation refuses a duplicate for as long as the identical job is queued or in flight. Once the batch has drained, reprocessing again works immediately. So if figures do not move on a quick second attempt, the first batch is probably still working through the queue. Let it finish, then check one employee's payslip.
There is no finalize or lock step
Nothing in these screens approves, locks, closes, or marks a period paid. A period stays editable and re-runnable forever, so a payslip you have already handed out can be changed under you by the next reprocess.
Payment itself happens outside FEMS. Payroll calculates the figures and prints the payslips. It does not post salary to the accounts ledger.
For reference, these are the labels the STATUS chip can show:
| Chip | Meaning |
|---|---|
| Upcoming | Created, not yet in play. No Process or Reprocess button on the row. |
| Current | Eligible for generation. The Process button shows here. |
| Ready to Generate | Marked for the next generation run. The Reprocess button shows here. |
| Generated | Payslips produced. Never reached today. |
| Completed | Closed, and the edit pencil is hidden on the row. Never reached today. |
Generated and Completed are labels with nothing behind them. Nothing in payroll moves a period into either state, so a row only ever reads Upcoming, Current, or Ready to Generate. A period that stays on Ready to Generate after a successful run is normal and is not a sign that something failed.
How a payslip is calculated
This is the part worth reading slowly, because it decides what a teacher is actually paid.
The chain starts from the assigned gross and works down:
per-day rate      = gross / 30

working days      = every date in the period that is not a Friday or Saturday,
                    adjusted by any schedule override

attended days     = attendance records in the period that have been APPROVED
                    (a weekend or holiday punch counts too, so attended days can
                     exceed working days and push absent days down to zero)

absent days       = working days - attended days - paid leave days - unpaid leave days
                    (never below zero)

absent deduction        = per-day rate x absent days
unpaid leave deduction  = per-day rate x unpaid leave days
late deduction          = per-day rate x (unapproved late marks / threshold, rounded down)

total deduction   = late + absent + unpaid leave

additions         = always zero today (see Adjustments below)

net payable       = gross - total deduction + additions
Seven things about that chain deserve to be said plainly.
The divisor is always 30. The per-day rate is the gross divided by 30 in every month. February uses 30. A 31-day month uses 30. This is a fixed rule in FEMS, not a setting, so a day of absence costs the same amount whatever the month length.
Weekends are Friday and Saturday. They are not counted as working days unless a schedule override makes a specific date a working day. An override can also turn a weekday into a holiday, which lowers the working-day count and so lowers absent days.
Only approved attendance counts as a day worked. A punch that is still sitting on an unapproved correction is not a day worked, and the employee is counted absent for it. The count also runs across the whole period with no weekend filter, so a Friday or Saturday punch adds to attended days. Enough weekend punches drive absent days to zero and hide real absence.
Leave splits two ways. Approved leave on a type marked salary-deductible counts as unpaid leave and is charged a day's pay each. Approved leave on any other type costs nothing, and it also protects the employee from being counted absent for those days. Leave that was never approved protects nobody.
Leave that crosses a month boundary is counted in full in both months. A leave request is charged at its whole length to every pay period its dates touch, not at the days that actually fall inside the period. A 10-day unpaid leave spanning month end costs 10 days of pay in each of the two months, so 20 days of pay for 10 days of leave. A straddling paid leave has the mirror problem: it takes 10 days off the absent count in both months and masks real absence. Ask staff to file a separate request per month, and check by hand any leave whose dates cross the period's From Date or To Date.
Nothing is added on top of the gross today. The additions line is always zero, because no adjustment created in these screens reaches the payslip. See Adjustments below.
The assigned deduction heads are not subtracted here. Income tax, provident fund, and the other deduction heads on the employee's salary structure appear in the payslip's deduction breakdown, but the net payable above starts from the flat gross and takes off only the attendance-based deductions. So the breakdown and the net figure disagree on every payslip that carries a deduction head. This is a known defect, tracked as issue #2461. Check the net figure against your own expectation before you pay anyone, and do not release payslips whose breakdown and net you cannot reconcile.
A worked example
One teacher, one month, figures in your school's currency.
| Input | Value |
|---|---|
| Assigned gross | 30,000 |
| Working days in the period (a 30-day month, Friday and Saturday off) | 22 |
| Days with approved attendance | 19 |
| Approved paid leave | 1 day |
| Approved unpaid leave (a salary-deductible type) | 1 day |
| Unapproved late marks | 7 |
| Late-arrival threshold | 3 |
Worked through:
per-day rate            = 30,000 / 30                = 1,000

absent days             = 22 - 19 - 1 - 1            = 1
absent deduction        = 1,000 x 1                  = 1,000

unpaid leave deduction  = 1,000 x 1                  = 1,000

late days               = 7 / 3, rounded down        = 2
late deduction          = 1,000 x 2                  = 2,000

total deduction         = 1,000 + 1,000 + 2,000      = 4,000
additions                                            =     0

net payable   = 30,000 - 4,000 + 0                   = 26,000
Note what the paid leave day did. It cost nothing, and it kept that day out of the absent count. Without it the absent count would have been 2 and the teacher would have lost another 1,000.
Note also the seventh late mark. Three marks make one deducted day, so six of the seven cost two days and the leftover mark costs nothing. It does not carry into next month either.
Adjustments
An adjustment is a one-off amount attached to one pay period: a festival bonus, an allowance, a fine.
Adjustments do not change the payslip today. Read the section below before you use this tab at all.
Adding one
Open the Adjustment tab and click Add New. The Salary Adjustment form opens.
| Field | What to enter |
|---|---|
| Payroll | The pay period the amount belongs to. |
| Applied Type | Branch/Department or Individual. |
| Employee | Individual only. Search by ID or name. Typing 2 characters starts the search. |
| Adjustment Category | Which head the amount lands on. |
| Amount | Must be above 0. |
| Continue adjustment ? | Yes or No. |
| End Payroll | Optional. The period the adjustment should stop at. |
| Note | Optional. |
With Branch/Department selected, the Assigned To card on the right lets you switch on whole campuses (which cascades to their departments) or pick departments individually. There is an All Campus master toggle for everyone.
Click Submit.
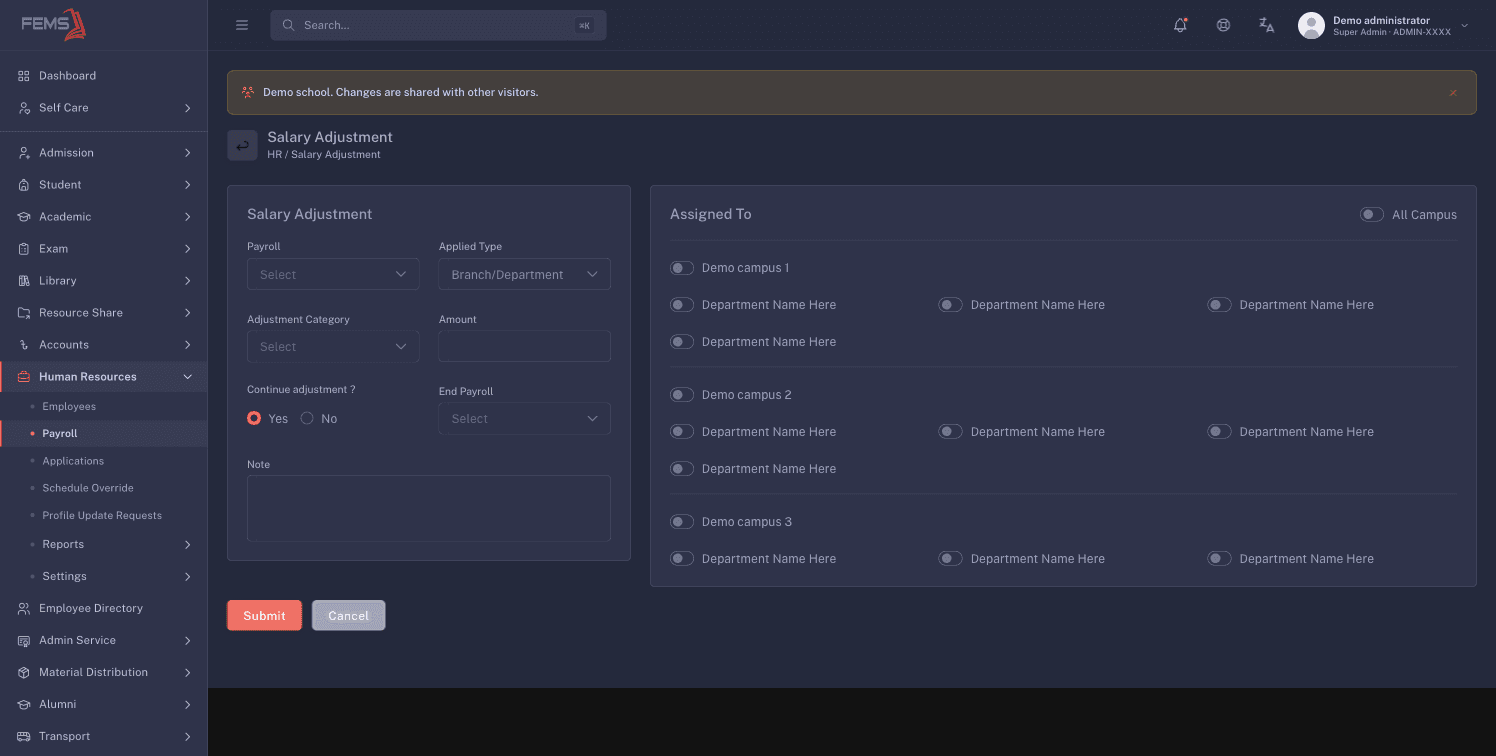
Always confirm the new row appears in the Adjustment tab. The form shows a success message even when the save did not go through, so a green toast on its own is not proof. Check the row is listed and its EMPLOYEE COUNT is not zero.
Adjustments do not reach the payslip
An adjustment made on this tab adds nothing to anyone's pay. The Adjustment Category dropdown only offers categories that the payslip calculation does not count, so the two sets never meet. The adjustment saves, it lists on the tab, and then it contributes nothing to OTHER, nothing to EARNING, and nothing to NET PAY. Reprocessing the period does not change that. This is a known defect, tracked as issue #2458.
What to do instead:
- Pay bonuses and allowances outside FEMS until the defect is fixed.
- Do not promise staff a bonus on a payslip. It will not be there.
- If you record adjustments on this tab anyway so the amounts sit in one place, tell whoever pays the bonus that the payslip is not the source.
Two further limits, for when adjustments do start working:
- Only earning-type adjustments are meant to reach the payslip. A deduction-type adjustment such as a fine is stored and is not taken off pay.
- Continue adjustment and End Payroll are recorded and shown on the adjustment, but nothing carries an amount into later months on their own. Add the adjustment to each period you want it on.
Reading one employee's payslip
Click the eye icon on a row in the Employee Payslip tab to open View Details.
The left card holds the money:
- Earning, one row per earning line with Title and Amount, ending in a Total row.
- Deduction, the same shape. Attendance lines carry their day count in the title, for example a late arrival line reading with 2 Days beside it.
- Net Payable Amount on its own row.
The right card holds the attendance the figures came from: one row per date with Date, In Time, Out Time, Hours, Status and Type. An in-time shown in red is a late arrival. Type says whether the record came from the attendance device (System) or was entered by hand (Manual).
| Attendance status | Meaning |
|---|---|
| Present | Attended. |
| Absent | No record for a working day. |
| Off Day | A weekend day with no record. |
| Present/Absent | Attended but both arrived late and left early. |
| Absent (Approved) | A manual record marked as approved absence. |
Click Close to go back to the list.
Printing
The printer icon on a row opens the printable payslip in a new window. Allow pop-ups for the site, or nothing opens and you get Please allow pop-ups to print the payslip.
The printed sheet carries your school and campus details in the header, then the employee's ID, name, department, designation, joining date, pay period, and bank details, then the earning and deduction columns side by side with a Total on each.
Below that sit Previous Balance, Net Payable (Rounded) and Carry over-Round-off, then the amount written out in words. The printed net is rounded down to a whole amount and the fraction is shown as the carry-over, so a printed payslip can read up to one unit lower than the on-screen net payable. The Earned Leave and Remaining Leave lines print as N/A Day at the moment and do not reflect the employee's real balance.
Where payslips reach staff
Employees do not need anything from you to see their own payslip. Once generated, it appears under Self Care > Salary & Payslips, where they can open the full breakdown and print it themselves. See Salary and payslips in Self Care.
FEMS does not email payslips out as part of this run.
FAQ
I clicked Process and nothing happened. Where are the payslips? Process only marks the period ready. Generation runs overnight at 02:00. For payslips today, look at the row again: it now reads Ready to Generate and carries a Reprocess button. Click that and submit the drawer a second time.
Some employees have no payslip at all. Check, in this order: the person has a group and a gross on the Payroll Assign tab, the person is active, and the person's campus is one of the campuses stored on the pay period. Administrator accounts never appear on the Payroll Assign tab at all, so they can never be given a gross and never get a payslip.
The Employee Payslip tab is empty right after a successful run. Expected, and not a sign that the run failed. That tab is anchored to a period that generation never runs on. Check one employee under Self Care > Salary & Payslips instead, and do not reprocess again.
I added a festival bonus as an adjustment and it is not on the payslip. Adjustments do not reach the payslip today, whichever category you pick and however many times you reprocess. Pay the bonus outside FEMS. This is a known defect, tracked as issue #2458.
Everyone is showing as fully absent and net pay is near zero. Attendance for the period is almost certainly unapproved or was never recorded. Only approved attendance counts as a day worked. Fix the attendance, then reprocess the period.
Nobody is being charged for late arrivals. The late-arrival threshold is an institution-wide setting with no screen in this console, and if it is missing no late deduction is applied at all. The fields on the pay period that mention late arrival do not drive it. Ask your administrator. See Setting up payroll.
Can I generate a payslip for one employee only? No. Generation always covers every employee at every campus on the period.
Does FEMS post salaries to the accounts ledger? No. Payroll calculates and prints. Disbursement is handled outside FEMS today.