Maintaining employee records
Hire, onboard, and manage employment details through to exit/clearance.
The Employees screen is where an HR admin keeps the staff roster: finding a teacher or driver, adding a new hire, correcting employment details, and recording an exit. Everything on this page describes one employee record from the day it is created to the day the person leaves.
Prerequisites
Your role needs access to Employees in Human Resources. Adding, editing, exporting, and printing are separate accesses, so you may be able to open a record but not change it. Ask your system administrator if a button described here is missing for you.
Go to Human Resources > Employees.
Find an employee
The list opens on three stacked blocks: the Statistics cards, the collapsed Filter panel, and the Employee List table.
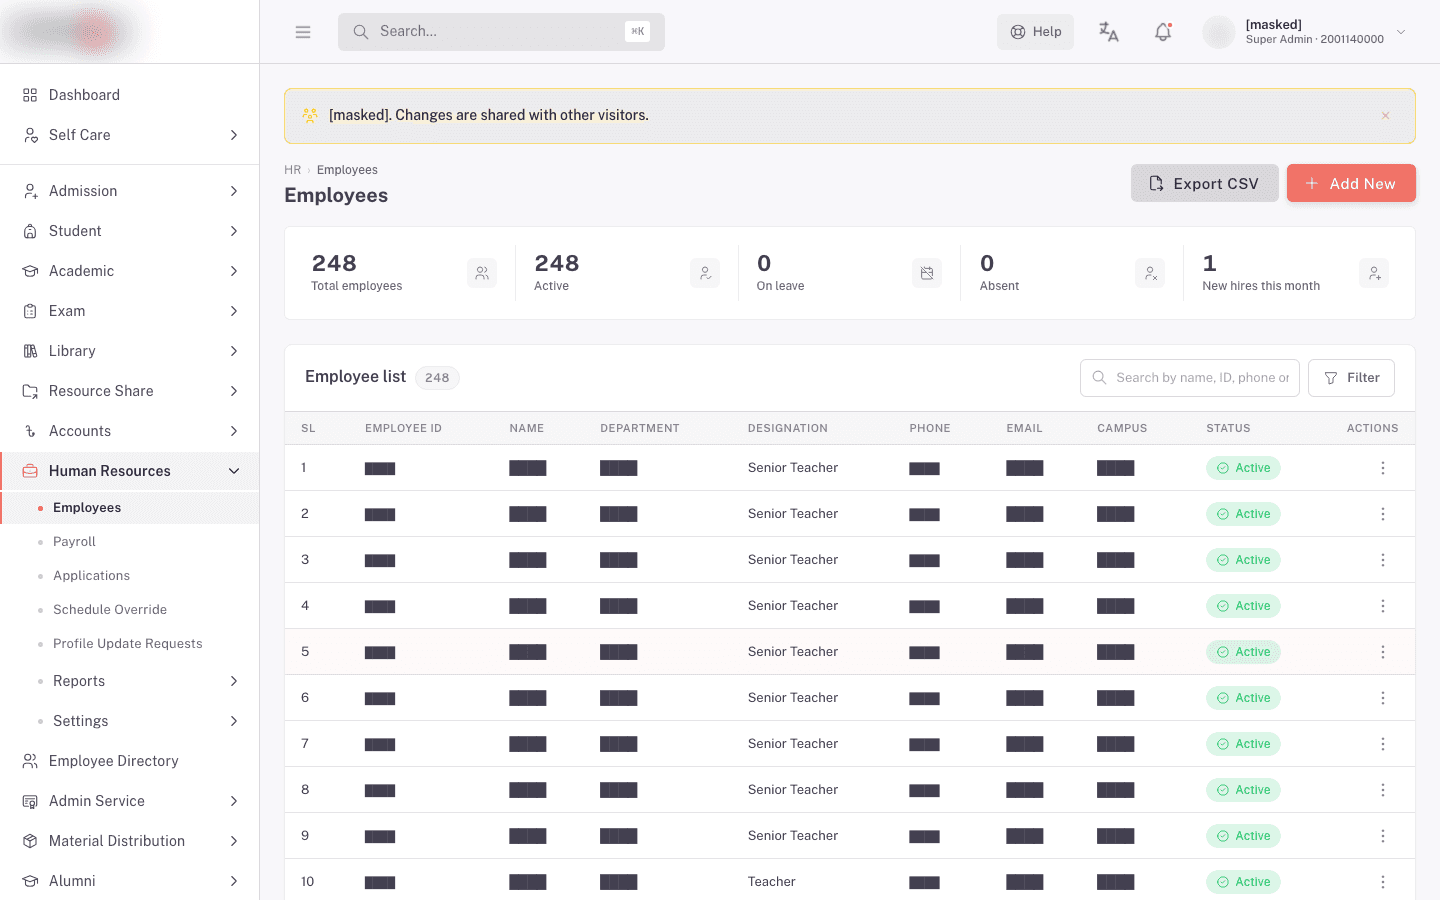
What the Statistics cards count
| Card | What it counts |
|---|---|
| Total Employees | Employees matching whatever filters are set. With no filters, this counts active employees only. |
| Active Employees | The same filtered set, narrowed to active employees. |
| On Leave | Approved leave days that cover today. Somebody with two overlapping approved leave records is counted twice, so this can read higher than the number of people out. |
| Absent Employees | Employees in the filtered set who have an attendance record today. The label is incorrect because these are employees recorded as present. |
| New Hires This Month | Employees whose joining date falls in the last month, counted back from today rather than from the 1st of the month. |
The cards are read-only. Clicking one does not filter the table. Every card recounts when you change a filter or the search box, so the numbers always describe the same set of people as the rows below them.
The table columns
Rows show SL (a running serial), Employee ID, Name, Department, Designation, Phone, Email, Campus, Status, and an actions column.
Two columns are narrower than they look. Department shows the department's short name, not its full name. Phone shows the personal mobile number, so an employee with only an official mobile recorded shows a blank here.
Every column except SL and the actions column sorts. Sorting reorders the rows on the page you are looking at, not the whole filtered list, so sorting by name on page 1 does not pull in the A names sitting on page 3.
Click anywhere on a row to open that employee's record.
Narrow the list with Filter
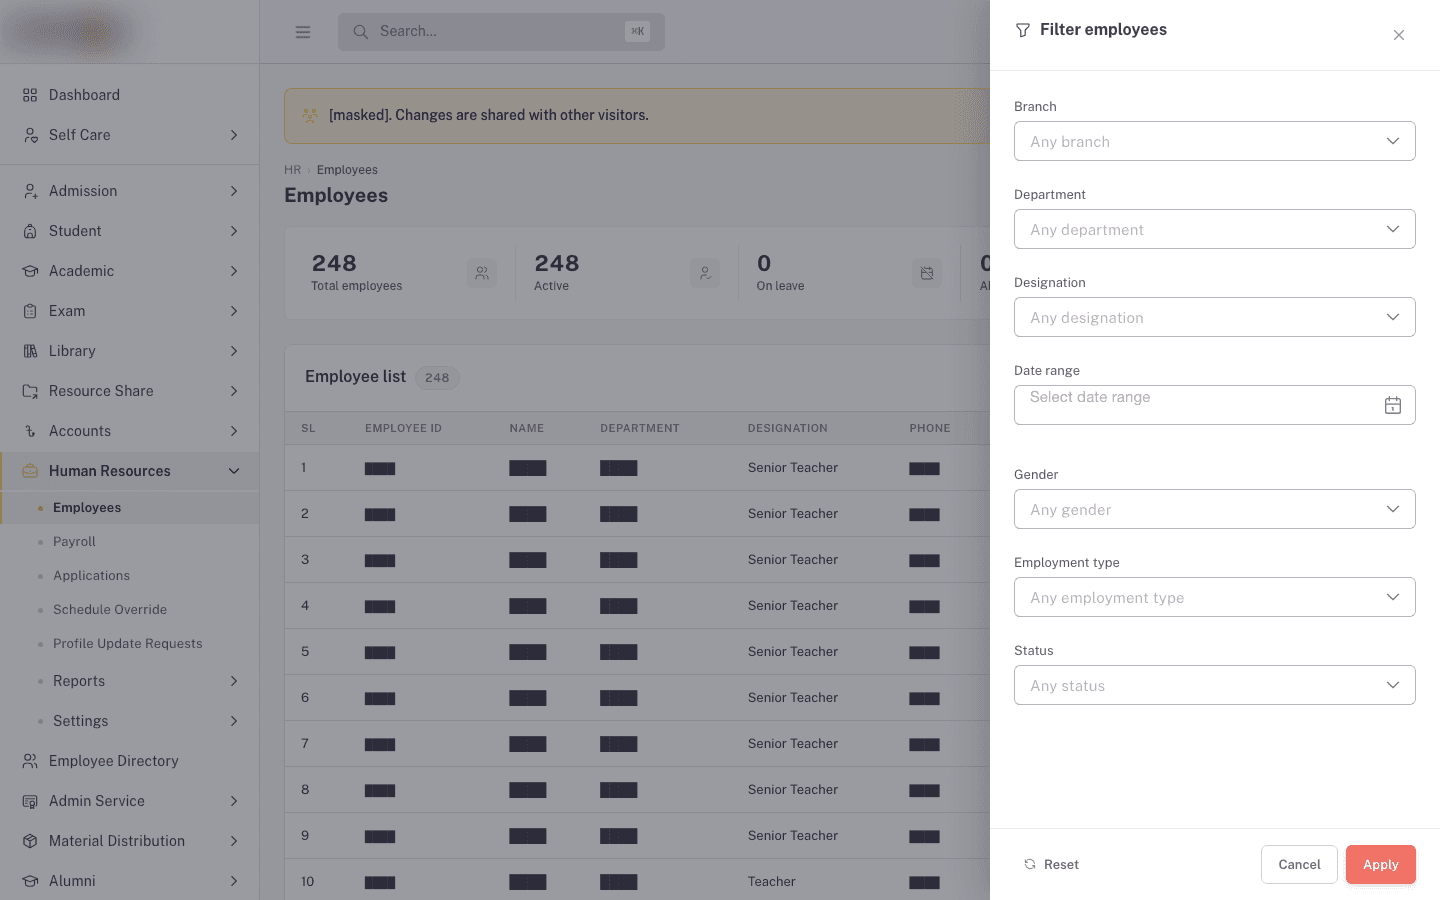
Click Filter to expand the Filter employees panel. It holds seven filters: Branch, Department, Designation, Date Range, Gender, Employment Type, and Status. The date range is one control, not separate Joining From and Joining To fields.
- Pick a Department first if you want to filter by job title. Designation is cascaded from Department, so it only lists designations belonging to the department you chose.
- Pick the rest of the filters you need. The panel keeps your choices until you apply them.
- Use Date Range to pull everyone who joined in a date range.
- Click Apply to run the filter, or Reset to clear it. Cancel closes the panel without applying changes.
Changing Department after you have already picked a Designation clears the designation when the two no longer match. That is expected, not an error.
Search
The Search Employee box sits in the table toolbar, above the columns. Type and stop; the list refreshes about half a second later and jumps back to page 1.
Search looks across first name, last name, full name, employee ID, personal mobile, official mobile, telephone, official email, personal email, and designation. So typing a phone number or a job title finds people just as well as typing a name. Partial words work.
Row actions
The actions column holds up to three plain icons with no labels or tooltips:
| Icon | What it does |
|---|---|
| First (eye) | Opens the employee's record. Everyone who can see the list can use it. |
| Second (key) | Opens that person's permission screen, if your role can assign access. |
| Third | Opens Log in as employee, so you can see FEMS the way they do. |
Signing in as an employee is limited to top-level administrator roles. Having the impersonate access on its own is not enough, so if the third icon does not appear for you, your role is the reason.
Clicking the third icon opens a Login as Employee confirmation naming the employee. Click Yes, Login to switch, or Cancel to stay where you are.
There is no edit icon and no delete icon on a row. Employees are never deleted in FEMS. You edit a record from inside it, and you retire a person through the Exit Info tab.
Export CSV
Click Export CSV to download the roster. The button reads Exporting... while it works.
The file contains every employee matching your current filters, not just the page on screen, with the columns SL, Employee ID, Name, Department, Designation, Phone, Email, Campus, and Status. It saves as employees_YYYY-MM-DD.csv.
If the filtered list is empty, a browser message says No data to export. Clear a filter and try again.
There is no print button on the list. Printing is per employee, from inside the record.
Pagination
The footer reads Showing 1 to 10 of 240 entries and lets you set Items per page: to 5, 10, 15, 25, or 50. The default is 10. The refresh icon beside the count reloads the page you are on.
The employee you just saved is not in the list
This is the most common surprise on this screen. You save a new hire as a draft, land back on the Employees list, and the person is not there. Nothing was lost. The list hides drafts.
With no Status filter chosen, the list shows active employees only. Draft and inactive records are filtered out before you see them, and the Statistics cards count the same reduced set.
To see them:
- Click Filter.
- Set Status to Draft for a record you saved with Save Draft, or Inactive for someone who has left.
- The record appears in the table. Click the row to open it.
Do the same before you conclude an employee "does not exist" and create them a second time. Search alone will not surface a draft, because the default active-only rule still applies to a search.
Add a new employee
Click Add New on the Employees list. The page header reads Add New Employee.
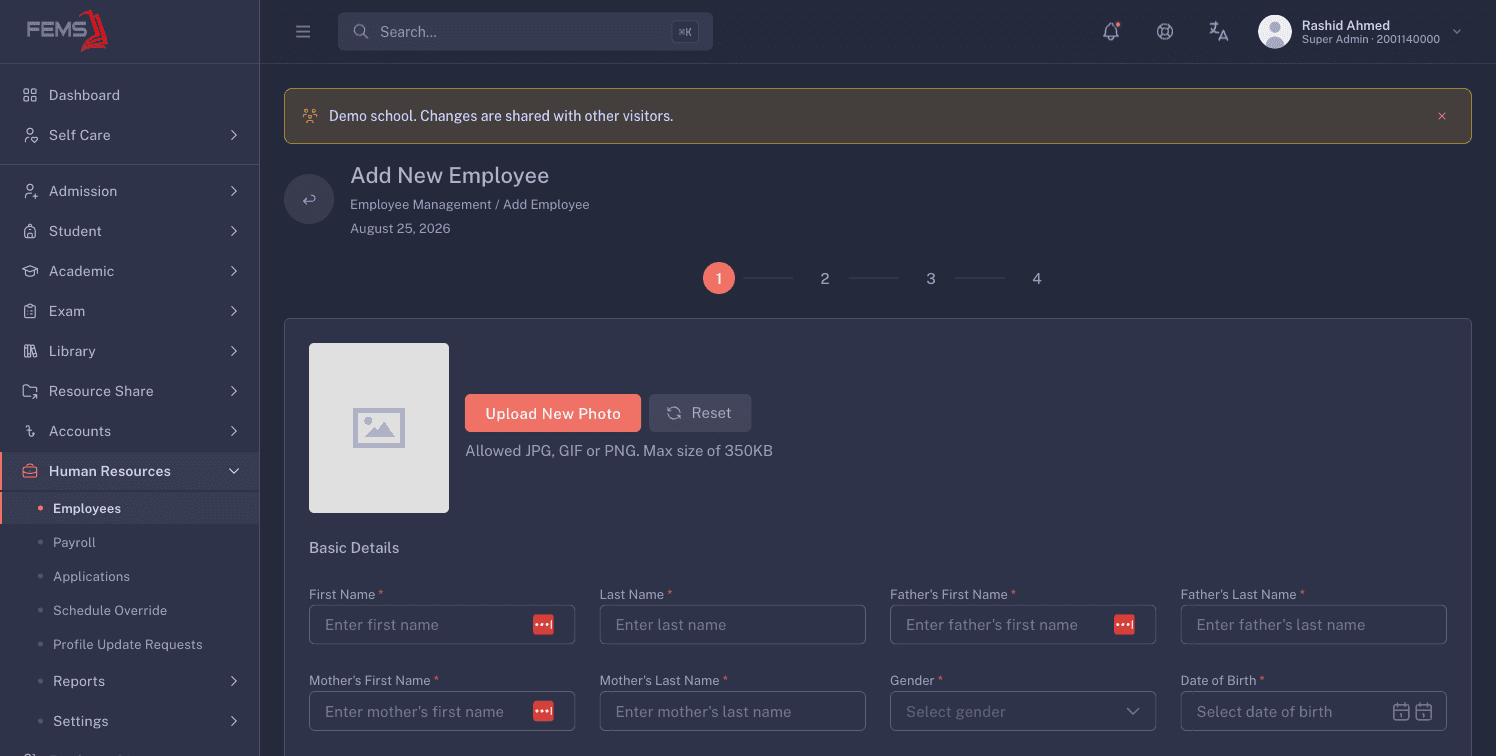
The form runs over four steps. The step indicator at the top is four numbered circles joined by lines, with no titles on them, so use the card headings on each step to tell where you are.
At the top of step 1 you can also set the employee's photo. Click Upload new photo, or Reset to drop it. The helper text reads Allowed JPG, GIF or PNG. Max size of 350KB, and anything larger is rejected with a message telling you the size limit.
Step 1: personal details
Collects who the person is: Basic Details, Nationality & Identification, Personal Contact Info, Present Address, Permanent Address, one or more emergency contacts, and Reading & Special Needs.
Points worth knowing:
- Nationality offers Bangladeshi, Non-Bangladeshi, and Foreigner, and it decides which identification fields you get. Bangladeshi asks for National ID, passport, driving license, and birth certificate. The other two ask for country, passport dates, place of issue, and (for Foreigner) work permit details. Changing nationality clears everything you already typed in that section, so set it before you fill the identification fields.
- Present Address cascades: Division, then District, then Thana, then Post Code. Changing a level clears every level below it.
- Tick Use Present Address as Permanent Address and the Permanent Address card disappears and its contents are cleared.
- The first emergency contact block is titled Emergency Contact 1. Click Add More for a second one. The delete icon only shows once there are two or more.
Step 2: employment details
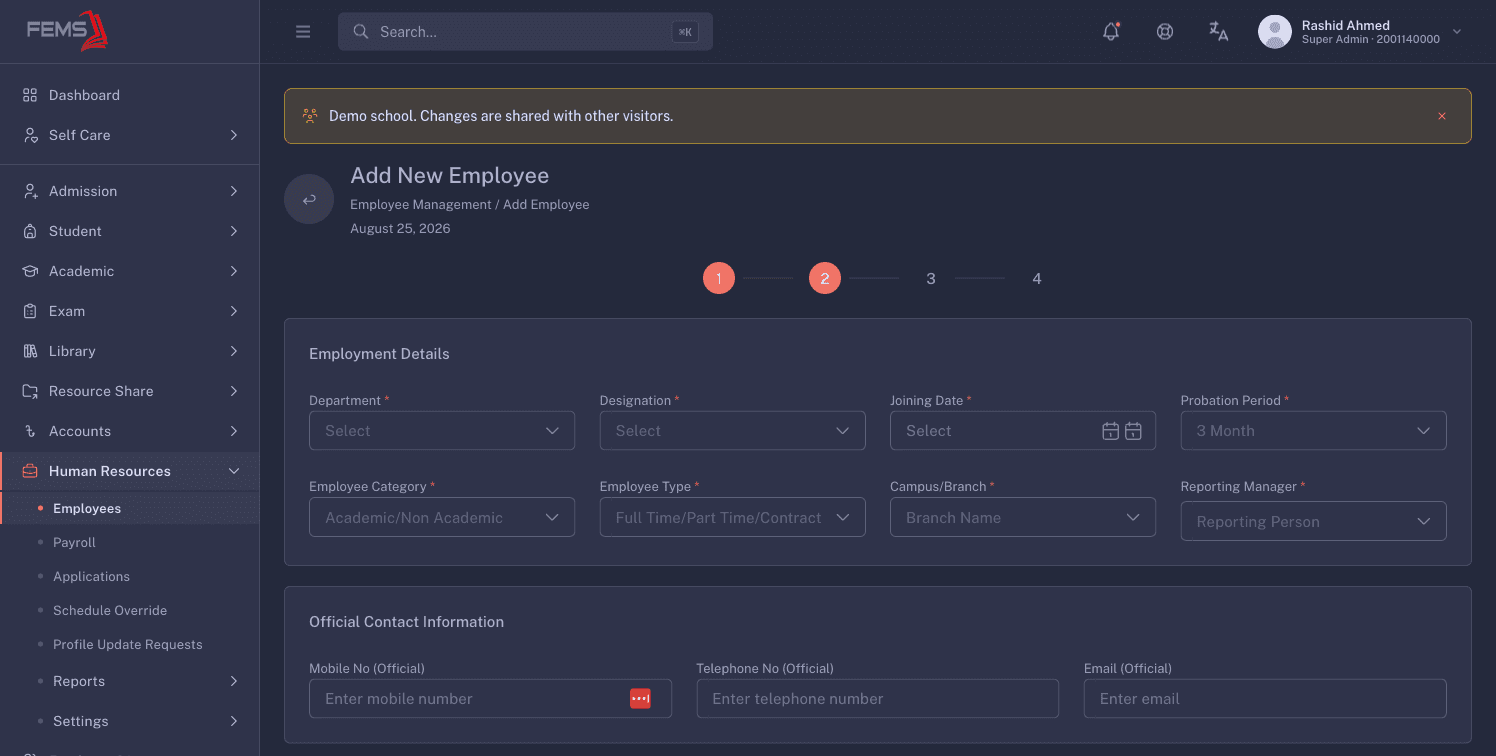
The step that makes the record a job rather than a person. Cards: Employment Details, Official Contact Information, Salary Disbursement, Work Schedule, and Leave Balance.
- Employment Details asks for Department, Designation, Joining Date, Probation Period, Employee Category, Employee Type, Campus/Branch, and Reporting Manager. Choose the department first, because the designation list reloads for that department. Probation Period is a number of months.
- Employee Category and Employee Type list whatever your school set up under Human Resources > Settings, so the options differ between schools.
- Email (Official) is the one field checked for format as you type, and it is checked against every other FEMS account when you save. See Official email is already in use.
- Salary Disbursement starts with Payment Method. Account Title and Account No appear only for the payment methods that need a destination account, and stay hidden for the rest.
- Work Schedule has a Flexible Work Schedule checkbox, a Select Schedule field, and then one row per working day where you set a shift or mark the day a weekend. On the demo, Select Schedule lists time ranges such as 09:00 AM - 05:00 PM. That setting drives this person's daily timetable, so it is what late arrival and early departure are measured against. It does not change the payroll working-day count or the Attendance Dashboard, which both treat Friday and Saturday as the weekend for everybody.
- Leave Balance takes opening balances in days for casual, sick, maternity or paternity, and annual leave.
Step 3: qualifications and past jobs
Two cards. Educational Qualification takes Level, Discipline/Program Name, the result field labelled Class/Percentage/GPA/CGPA, Passing Year, Institute Name, and Major/Optional Subject. Work Experience takes the previous employer's name, contact details, country, address, designation, salary, start and end dates, and reason for leaving.
Both cards start with one block and both have an Add More button. The first block cannot be removed; blocks after it get a delete icon. Level options come from your school's educational qualification setup.
Step 4: documents and handover items
Four cards.
- Documents has seven upload slots: Signature, National ID, Passport, Offer Letter, Previous Experience Letter, NOC, and Work Permit / Residence Permit. Each shows No file chosen until you click Choose. Images and PDFs are accepted, up to 1 MB each.
- Work Essentials Tracking records what the employee is issued: a laptop, an ID card, a vehicle. It starts empty. Click Add More to create a row, then fill Item Name, which is required on any row you create. Usage Status offers Assigned, Returned, Lost, Under Repair, and Replaced. Item Condition (At Issue) and Item Condition (At Return) offer New, Good, Fair, Poor, and Damaged.
- Feedback records a reference person and how the new hire heard about the school.
- Notes is a free text box for anything else.
If you add a work essentials row and leave Item Name blank, you cannot submit. Delete the row with its trash icon to clear the block.
The "how did you hear about us" question on step 4 currently has one school's name written into its label, so the wording reads wrongly on every other school. That tenant-identity defect is tracked under umbrella issue #2463. Answer the question as if it named your own school.
Save Draft or Submit
Five buttons sit under every step: Save Draft, Next, Submit (step 4 only), Previous, and Cancel. Previous sits to the right of Next, not to the left of it.
Save Draft works from any step. It saves everything typed so far and skips all the required-field checks, so use it when a joining letter or a National ID has not arrived yet. You'll see Employee draft saved successfully and land on the new record, which is created with the status Draft.
Submit appears on step 4. It checks the whole form and creates the employee as Active. You'll see Employee created successfully and land on the new record.
Next checks only the current step. A missed field gives you a message naming the field, for example First Name: This field is required, and the form scrolls to it and highlights it in red.
Cancel asks for confirmation before it clears the form and returns you to the Employees list.
About the star markers: the fields marked with a star are required to move past Next or Submit. They are not required for the record to exist. Only a first name and last name are truly needed, which is why Save Draft can save a nearly empty form. Treat the stars as your school's data-quality standard, not as a technical limit.
If the server rejects something after you press Submit, the form jumps back to the step that owns the offending field and shows the message there. Check the step it lands on rather than the step you were on.
Read and edit an employee record
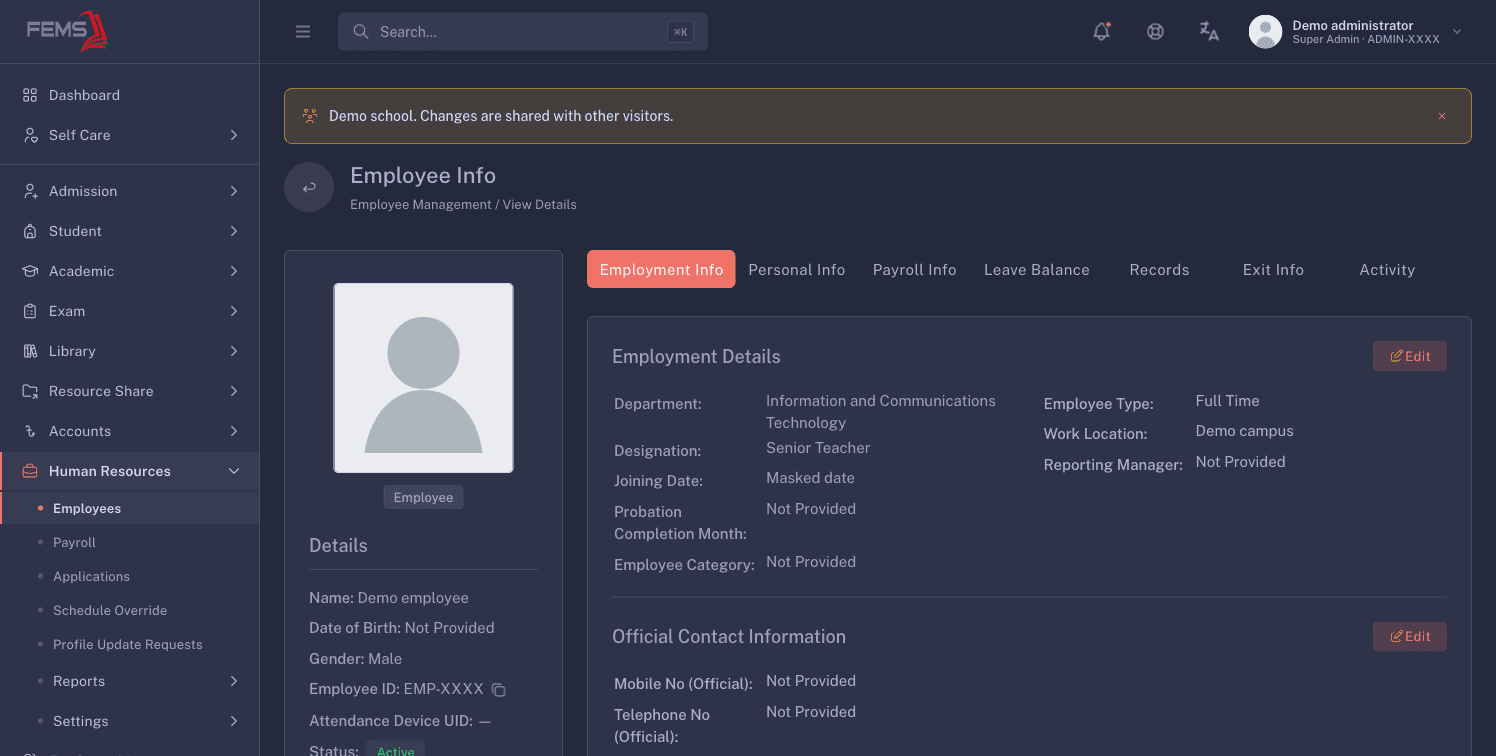
Click a row on the Employees list, or the eye icon. The page is headed Employee Info, with a profile card on the left and tabs on the right.
The profile card shows the photo, name, date of birth, gender, Employee ID with a copy button, Attendance Device UID, status, assigned roles, then department, designation, campus, email, phone, reporting manager, present address, and emergency contact.
Attendance Device UID is what links this person to their punches from an RFID card, fingerprint, or face reader on a school whose device software pushes punches into FEMS. If the school instead has FEMS read the device software's own database, the link is the employee ID rather than this field. Either way, this is the first field to check when somebody who was at work shows as absent. Tracking staff attendance covers both setups.
Empty values show as Not Provided or Not Assigned, except an unset Attendance Device UID, which shows as a dash.
At the bottom of the card are Print ID Card and Print Profile, and, for a draft record only, Activate Employee.
The seven tabs
| Tab | What it holds |
|---|---|
| Employment Info | Employment details, official contact information, and the week's work schedule with start and end times per day. |
| Personal Info | The longest tab: basic details, nationality and identification, personal contact, addresses, educational qualifications, work experience, emergency contacts, and disability details. |
| Payroll Info | The salary structure as earnings and deductions with totals and net payable, the salary disbursement account, and loan and advance limits. |
| Leave Balance | One row per leave type with Total, Used, and Remaining. |
| Records | Uploaded documents and the work essentials issued to this employee. |
| Exit Info | Resignation, handover, clearance, and exit feedback. |
| Activity | A dated timeline of every change to this record and who made it. |
Tabs are reflected in the address bar, so you can copy the link while the Exit Info tab is open and send someone straight to it.
Editing happens section by section
There is no single edit screen for an employee. Each section of each tab has its own Edit button, and clicking it slides a drawer in from the right holding just that section's fields. Fill it in, click Submit, and the drawer closes with a confirmation.
That means you can hand a colleague the job of fixing one person's bank account without opening their whole record for editing. It also means a change to employment details and a change to personal details are two separate saves.
A few fields live in only one place:
- Extension is on the official contact drawer but not in the add-employee form.
- Attendance Device UID is on the record but not in the add-employee form, so set it after the person is created. Do it on the day you create the person, or their punches have nothing to attach to.
- The add-employee form splits a parent's name into first and last name; the edit drawer takes Father's Name and Mother's Name as single fields.
One rule catches people out on emergency contacts. In the add-employee form every emergency contact field is optional. Once the employee exists, saving that section requires Name, Relation, and Primary Phone. Alternative phone, email, and address stay optional. If you saved a contact with just a name at creation, add the relation and the primary phone before that section will save again.
Statuses and activating a draft
| Status | What it means | Where you see it |
|---|---|---|
| Draft | Created with Save Draft. The record exists but the person is not on the active roster. Amber chip. | Only when you filter Status to Draft. |
| Active | On the roster. Green chip. | The default list view. |
| Inactive | Off the roster. Red chip. | Only when you filter Status to Inactive. |
To move a draft to active:
- Open the draft record (filter Status to Draft to find it).
- Click Activate Employee at the bottom of the left profile card.
- You'll see Employee draft activated successfully, and the status chip changes to Active. The person now appears in the default list.
Before you activate, open the tabs and fill in anything you skipped while drafting. Activation itself does not check for missing fields.
There is no control anywhere in Employees for moving an active employee to inactive.
Record an exit and clearance
Everything about a departure lives on the Exit Info tab of the employee's record. Recording an exit does not change the employee's status, so an employee with a resignation recorded still shows as Active until someone changes the status separately.
The tab has five sections, each with its own Edit button and drawer.
Resignation Information holds Resignation Type, Resignation Date, Relieving Date, Encashment Date, New Workplace, and HR Comments. Resignation Type offers three values:
| Type | Use it when |
|---|---|
| Resignation | The employee chose to leave. |
| Termination | The school ended the employment. |
| Dismissal | The employment ended for cause. |
No field in this drawer is required, so you can record a resignation date on the day it is handed in and add the relieving date later. HR Comments is shown on the tab but is not in the drawer, so it is not edited from here.
Change Handover records the handover date, job responsibilities, ongoing projects, and internal and external contacts.
Clearance & Approval is a checkbox list, one line per clearance department your school configured under Human Resources > Settings. Tick a department once that department signs off, then click Submit. Each line reads Approved when ticked and Pending when not, so the section doubles as the clearance checklist you chase people with.
Employee Feedback and HR Feedback hold the exit interview answers from each side.
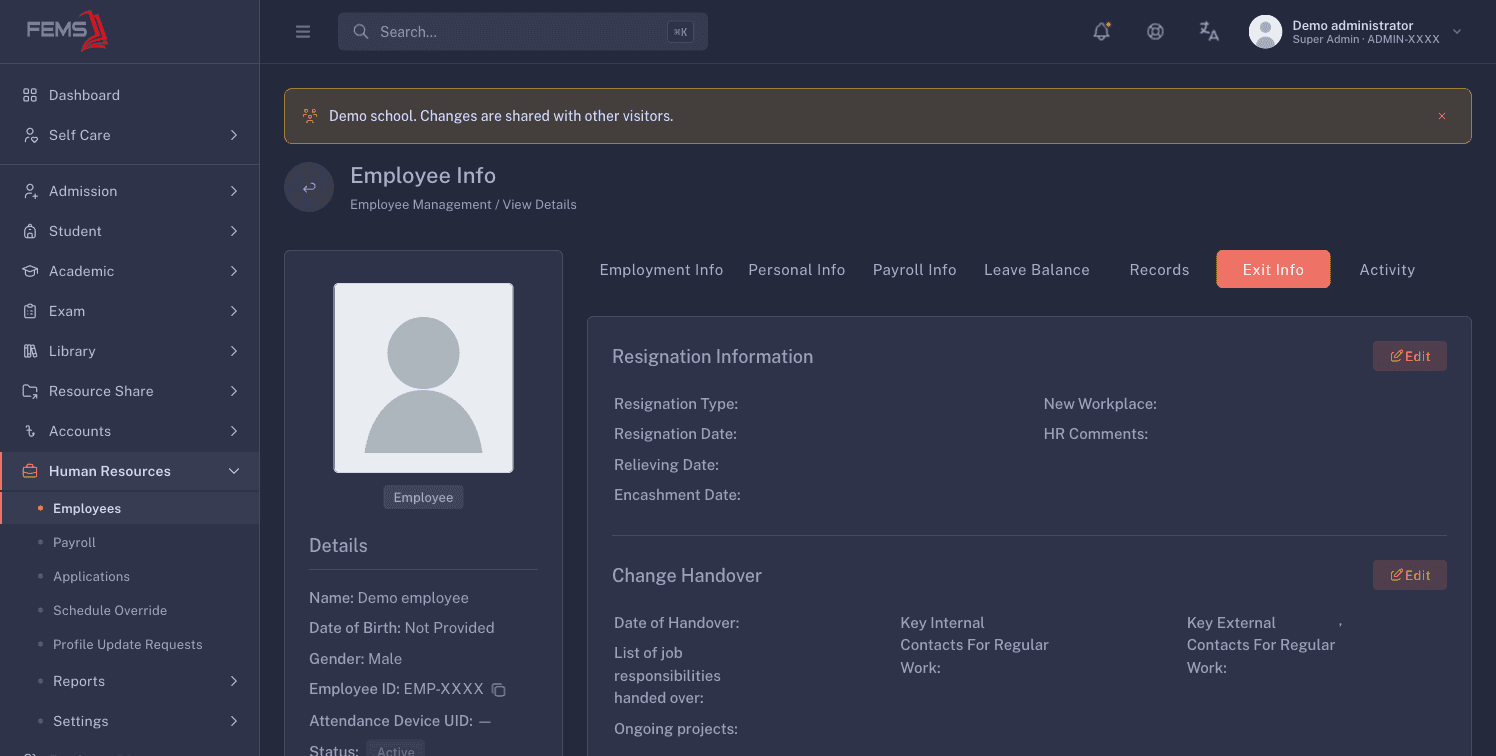
If no clearance departments are configured, Clearance & Approval appears as an empty section. Ask your administrator to configure the clearance departments before recording an exit.
Reload after every Exit Info save. A green confirmation on this tab is not proof that the values were stored. Reload the record and read your entries back before you treat the exit as recorded.
Official email is already in use
Official email addresses are unique across the whole of FEMS, not just your school, so this is the error you will meet most often when creating or editing an employee. The message appears under the Email (Official) field, not as a pop-up.
| What you see | What it means | What to do |
|---|---|---|
Official email ... is already assigned to ... (employee ..., active). Remove it from that employee before assigning it here. | Someone at your school already has that address, and the message names them, their employee ID, and their status. | Open that employee, clear the official email from their record, then save yours. Check the status in the message: it is often a draft or an inactive leaver still holding the address. |
This official email is already assigned to another FEMS account. Contact an administrator. | The address belongs to an account outside your school, so you cannot see or clear it. | Use a different address, or ask your system administrator to release it. |
Another official email change is in progress. Please try again. | Two saves touched the same address at once. | Wait a moment and submit again. |
Official email validation is temporarily unavailable. Please try again. | The uniqueness check could not run. | Submit again. If it repeats, raise it with your system administrator. |
Spacing and capitals do not help you get around this. Addresses are trimmed and lowercased before they are compared.
FAQ
I saved a new hire and now I cannot find them. Where did they go? They are almost certainly a draft. The list shows active employees only until you set Status in Filter to Draft. Do this before creating the person again, or you will end up with two records.
How do I delete an employee? You cannot. FEMS has no delete for employee records, by design, because attendance, payroll, and leave history hang off them. Record the departure on the Exit Info tab instead.
Why is the Designation dropdown empty? Pick a Department first. Designations are cascaded from the department, both in Filter and in the add-employee form.
Do I have to fill in every starred field before I can save? Not to save. Save Draft skips every check and stores what you have. The stars are enforced when you click Next or Submit, so use a draft while you are waiting on documents.
Why can I not see the third row icon, the one that signs me in as an employee? That action is limited to top-level administrator roles. Being given the access on its own does not reveal the icon, so ask your system administrator to check your role.
Does the CSV export only cover the page I am looking at? No. Export CSV covers every employee matching your current filters across all pages. Set the filters you want before you export.