Creating an exam and its timeline
Set up an exam for an academic session, fix its dates, pick its report template, and set the rules that decide when results can be printed.
An exam in FEMS is created once for one academic term, then set up class by class. This page covers the first half: creating the exam itself and its timeline. The class-by-class part is on Setting up a class exam.
Prerequisites
You need access to Exam > Exam Management. If that item isn't in your sidebar, your role doesn't include exam setup.
Before you start, your school needs an academic session, at least one academic term, the classes for that session, and a grading system to score against. Exams attach to a term, so the term has to exist first.
Open the exam list
Go to Exam > Exam Management. The page opens on the Exam List card.
Pick an Academic Session in the top-right of the card. The list only shows exams for the session you pick, and Create New Exam stays disabled until you pick one.
The list shows one row per exam:
| Column | What it shows |
|---|---|
| Academic Term | The term the exam belongs to. |
| Exam Name | The exam's name, such as First Term or Final. |
| Exam Dates | The start date, then the end date on the line below. |
| Publish Date | The exam's Results Released date. |
| Public Date | The exam's Results Public Access date, which is when students can see their own results. |
| Action | Config, plus view, edit, and delete icons. |
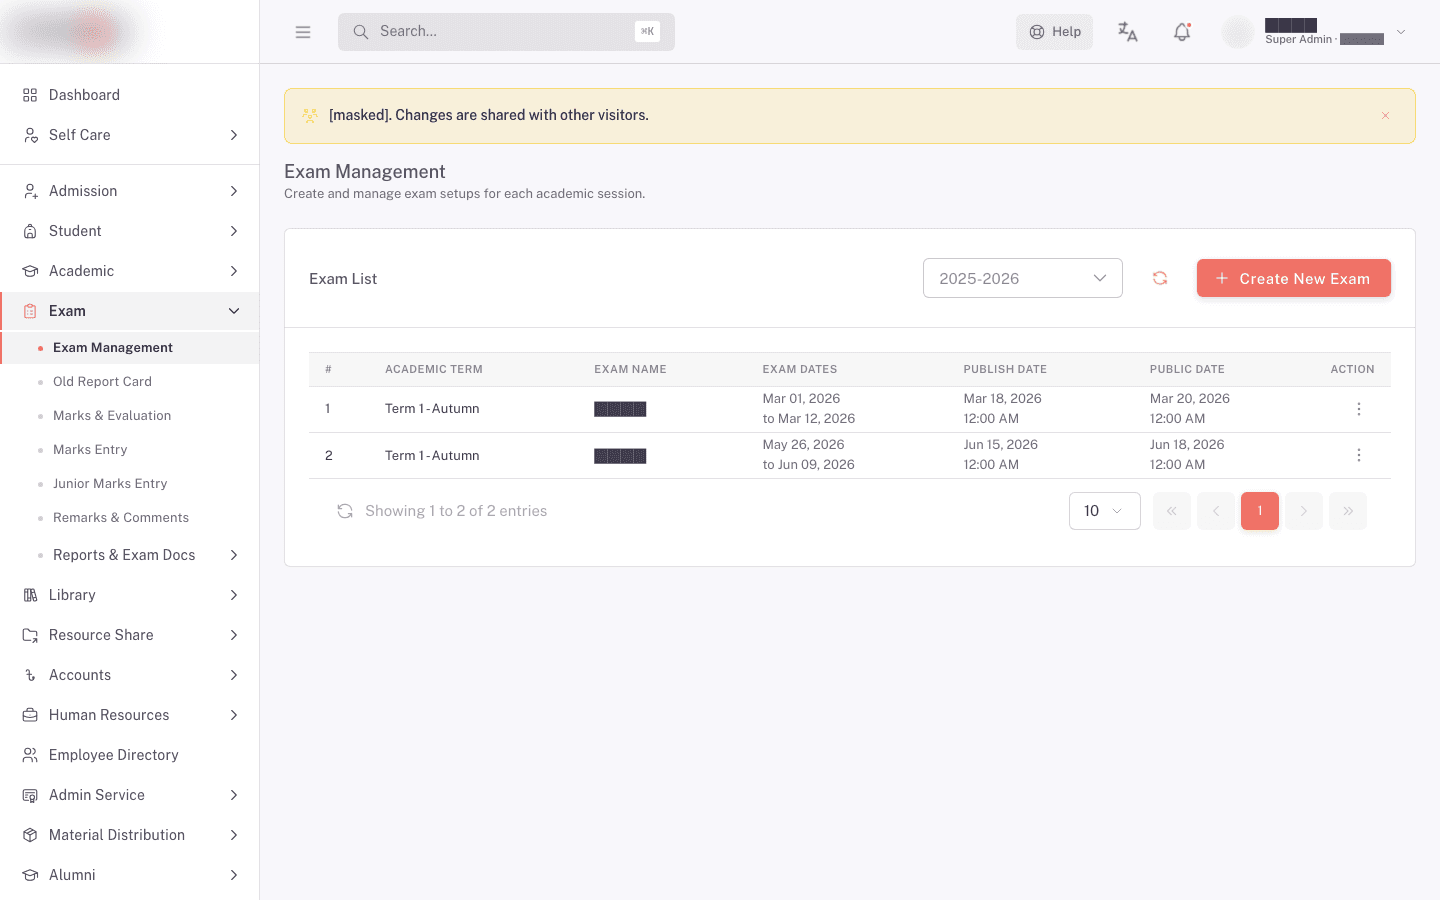
If the session has nothing in it yet, you'll see "No exams yet for this session."
Create an exam
-
Pick the Academic Session you're creating the exam for.
-
Click Create New Exam. A drawer opens on the right, titled Create New Exam.
-
Fill in Basic Details:
- Academic Term picks the term this exam sits in. Required.
- Exam Category Type is fixed to Regular and can't be changed.
- Exam Name picks the name from your school's list, such as First Term. Required.
- Grading System picks the grade scale used to turn marks into grades and GPA. Required.
-
Fill in the Exam Timeline. The form groups the dates into two stages.
Stage 1: Preparation
- Admit Card Release. Required.
Stage 2: Examination Period
- Exam Starts and Exam Ends. Both required.
- Assessment Deadline. Required. The last date for assessment-type marks.
- Written Exam Deadline. Optional.
- Marks Review Deadline. Required. The last date for checking what teachers entered.
- Results Released. Required. Your school's marker for results being finalised.
- Results Public Access. Optional. Students can't see their own report card before this date.
-
Set the Template Configuration:
- Select Template picks the printed transcript layout. Required.
- Turn on Show Component to choose which parts of the template print. The list of components loads from the template you picked. If it's empty you'll see "This template has no configurable components."
-
Set the Exam Config Policy:
- How many Failed subject will treat GPA as Failed? is meant to set how many failed subjects make the whole result a fail. Don't rely on it. Whatever number you enter, a student who fails any one main subject is recorded as failing overall. Failing only optional subjects does not fail the result.
- Marks show status on Tabsheet chooses between Converted and Raw Marks on the tabulation sheet.
- Report card can be printed after and Admit card can be printed after decide fee clearance, not dates. See below.
-
Click Create Exam.
You'll see "Exam created successfully." and the new exam in the list.
The timeline dates have to run in order
FEMS checks the order of the dates before it saves, and blocks the save with the exact problem. The rules are:
- The exam starts after the admit card is released.
- The assessment deadline is on or after the exam start.
- The written exam deadline is on or after the exam start.
- The exam ends after it starts.
- The marks review deadline is on or after the exam end.
- Results are released on or after the marks review deadline.
- Public access is on or after results are released.
If a required date is blank you'll see "All required timeline dates must be set." That one is a message only, with nothing highlighted on the form, so check the dates yourself and save again.
Set these dates carefully. Admit cards can only be printed between the exam's start and end dates, so a loose timeline can leave the office unable to print on the day it needs to.
Printing after fee clearance
Report card can be printed after and Admit card can be printed after control fee clearance, not dates. Pick a fee installment and FEMS refuses the document to any student who still owes money on it, and the message names the amount owed. In a class print run those students are skipped. Leave the setting empty if your school doesn't withhold documents over unpaid fees.
The list also offers After Publish Date and After Public Date.
View, edit, or delete an exam
- The eye icon opens Exam Config Details, a read-only view of everything you set, including the template and policy.
- The pencil icon reopens the same drawer as Edit Exam. Change what you need and click Save Changes. You'll see "Exam updated successfully."
- The trash icon asks "Are you sure you want to delete this exam? This cannot be undone." before it deletes. Deleting an exam that already has marks against it is not something to do casually. Check the tabulation sheet first.
Changing the Academic Term in the drawer clears the Exam Name you had picked, because exam names are listed per term. Pick the name again after you change the term.
Where the grading system comes from
Grading System on this drawer chooses which grade scale the exam uses. It lists the scales your school already has. It doesn't create one.
A grade scale is a list of bands. Each band covers a range of marks, gives a grade name such as A+, and is worth a number of GPA points. One band is flagged as the fail band, and that band's name is what prints when a student fails.
Grade scales are not created on this screen. Grading System only picks from the scales your school already has. Ask your FEMS administrator if you need a new scale or a change to an existing one.
A scale has to satisfy these rules before it saves, which is worth knowing when you ask for a change:
- The bands cover 0 to 100 with no gaps between them.
- GPA points never drop as the mark range goes up.
- Each grade name appears only once in the scale.
- The scale's name is unique within your school.
A scale attached to any active exam can't be deleted at all. It can still be edited, unless one of those exams has passed its public date, in which case editing is refused too. If a grade looks wrong for a mark, the band boundaries are the first thing to check.
What to do next
Creating the exam gives you the shell. Nothing can be marked yet. Click Config on the exam's row to set it up for each class: which subjects are in it, what they're marked out of, and what counts as a pass. See Setting up a class exam.
FAQ
Why is Create New Exam greyed out? You haven't picked an Academic Session yet. The button turns on once you do.
Why can't I change Exam Category Type? Every exam is created as Regular. The field shows the category but doesn't offer a choice.
Can I create the same exam for every class at once? You create the exam once for the term, then set it up per class from the Config action. The class-level setup is where subjects, marks, and pass marks live, and those differ by class.
What's the difference between Publish Date and Public Date? The list shows Results Released as Publish Date and Results Public Access as Public Date. Public access is the one students see: before it, a student looking at their report card gets "Transcript is not published yet!". Public access can't be earlier than the release date.
I changed the timeline. Do results recalculate? No. The timeline controls when documents unlock, not how marks are calculated. Marks recalculate when marks are saved.