Setting up a class exam
Say which subjects a class sits, what each is marked out of, what counts as a pass, and which subjects pair together.
An exam is created once for a term, but every class sits a different set of subjects. This page covers the class-level setup: the three-step wizard behind the Config button on the exam list.
Prerequisites
You need access to Exam > Exam Management, and the exam itself has to exist. See Creating an exam and its timeline.
The class's subjects also have to be assigned already. This wizard schedules and weights the subjects a class has. It can't add a subject to a class. If the subject list comes up empty, the class-subject assignment is what's missing.
Open the class exam list
- Go to Exam > Exam Management and pick the Academic Session.
- Find your exam in the list and click Config on its row.
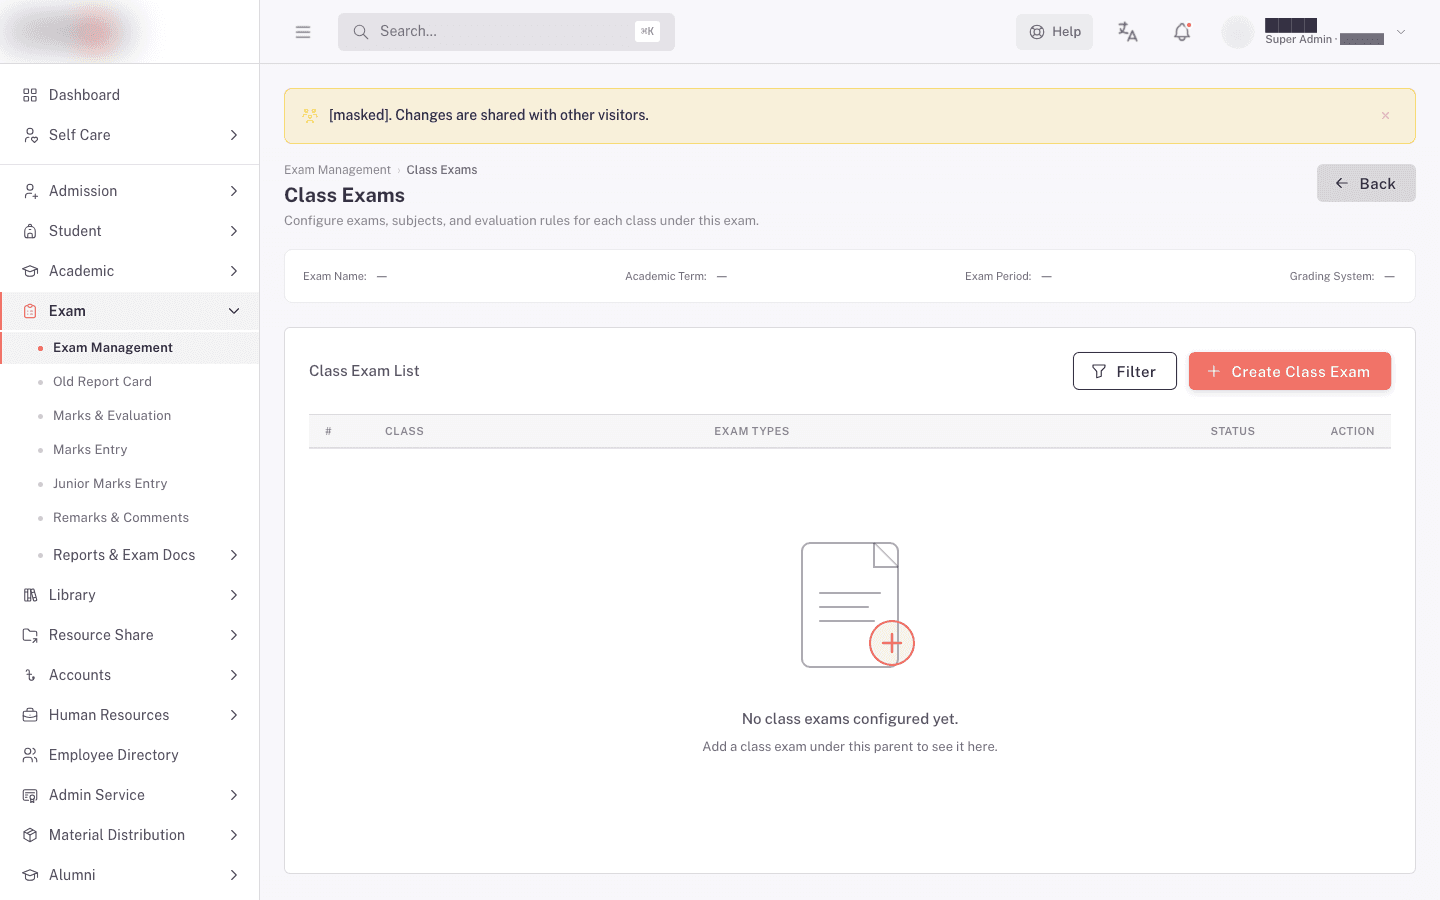
You land on Class Exams. A strip across the top repeats the exam's Exam Name, Academic Term, Exam Period, and Grading System, so you know which exam you're working inside.
The table lists one row per class:
| Column | What it shows |
|---|---|
| Class | The class this row sets up. |
| Exam Types | The parts marks are collected in, as chips. A dash means none are set yet. |
| Status | Active, Draft, or Not created yet. |
| Action | Edit and delete icons. |
Use the Class filter above the table to jump to one class. If nothing has been set up yet you'll see "No class exams configured yet." with the hint "Add a class exam under this parent to see it here."
The three statuses mean:
- Not created yet. No setup exists for this class. Students in it can't be marked.
- Draft. Setup was saved with Save Draft. It's kept, but it isn't live.
- Active. Setup was finished with Save & Continue and is in use.
A class sitting at Draft when the term starts is the usual reason marks entry has nothing to show. Reopen it and finish with Save & Continue.
Step 1: Exam Structure & Rules
Click Create Class Exam, or the edit icon on an existing row. The wizard opens on Exam Structure & Rules.
Class picks the class. It's required, and it only lists classes attached to this exam's term. When you're editing an existing setup the field is locked, with the hint "Class is locked while editing this configuration." To set up a different class, go back and start a new one.
Exam Components
A component is one part of the subject that marks come in for, such as the written paper or continuous assessment. Add one row per part.
Each row has:
- Exam Type. Required. The part being marked.
- Sub Exam Type. Appears when the type you picked has sub-types. Pick as many as apply. Your picks are only saved on Assessment components. On any other type the field takes a selection and FEMS discards it on save. Changing the Exam Type clears these.
- Weight (%) and Percentage (%). Both take 0 to 100.
- Override Weight?. A switch on the row.
Click Add Exam Component for another row, or the bin icon to drop one.
Weight Distribution
Use this when a class's result is built from more than one exam, such as a final result that carries part of the mid-term forward.
Each row picks an exam under Select Exam and gives it a Weight (%). Click Add More for another exam. The weights say how much each earlier exam contributes to this one's combined result.
Attendance Rules
Optional. Fill these in only if attendance affects this exam:
- Class Attendance Quantity
- Attendance Start Date and Attendance End Date
- PTM Quantity, the number of parent-teacher meetings counted
Leave them empty and nothing attendance-related is saved.
Inherited Exam Settings
Everything you set on the exam itself flows down to every class: basic details, timeline, template, and policy. This section lets one class differ.
There are four groups: Basic Details, Exam Timeline, Template Configuration, and Exam Config Policy. Each starts with its override switch off and its fields hidden. Leave a switch off and the class follows the exam. Turn it on and the fields appear for you to set for this class only.
Most classes need nothing here. Open it only when a class genuinely runs to different dates or prints on a different template.
Click Save & Continue to save and move on, or Save Draft to keep what you have without going live. Either way you'll see "Class exam configuration saved."
Step 2: Subject Configuration
This step lists every subject the class has for the term, one card each, and asks for the schedule and marks of each.
If the list is empty you'll see "No subjects assigned to this class for this term. Configure class-subjects first, then return." The subject assignment happens outside this wizard, and until it's done there's nothing here to set up.
For each subject:
- Leave Include Subject ticked for subjects in this exam. Untick it for subjects the class isn't examined on. Unticking is not a display toggle. It removes the subject's schedule and marks setup from this exam and re-runs the results for every student in the class, so any marks already entered for that subject stop counting towards totals, grades, and merit positions.
- Turn on Subject Segmentation for a subject sat as separate papers. The fields below then repeat once per paper, headed Paper 1, Paper 2, and so on.
- Fill in, for the subject or for each paper:
- Exam Date
- Start Time
- Duration (minute)
- Weight (%), the subject's share of the exam total
- Full Marks, the maximum obtainable
- Pass Marks, the minimum that counts as a pass
- Under Show In:, tick Report Card, Tab Sheet, or both, to say where the subject's marks appear.
- Under Calculated with:, tick the documents where the subject counts towards the calculated result. A subject can be shown without being counted, which is how many schools handle extra subjects.
Five of these are required on every included subject: Exam Date, Start Time, Duration (minute), Weight (%), and Full Marks. If one is missing, the save stops with "Fill exam date, start time, duration, weight and full marks for <subject> before saving." For a segmented subject the message names the paper too. If you untick every subject you'll see "Select at least one subject before saving."
Pass Marks is optional. Leave it blank and the subject has no pass mark for that part, so nobody can fail on it. Two more rules are checked when you save: pass marks above full marks is refused with "Pass Marks Must be Less than or Equal from Full Marks", and a subject whose component weights add up past 100 is refused with "Weight cannot exceed 100".
Set Pass Marks deliberately. A student below the pass mark on any part of a subject fails the whole subject, whatever their total. An absent student is saved as a zero, so a pass mark on a part also fails anyone who missed it. Set it to what your school actually treats as a pass, not a placeholder.
Step 3: Subject Pairing
Use this step when two or more subjects pass or fail together and print as one result, which schools usually do for paired electives.
- Click Add New Pair Group. A card appears, headed Pair Group 1.
- Type a Grouping Name. This is what the combined result is called.
- Pick the subjects under Select Subjects. Only subjects that split the same way can go in one group. Mix a segmented subject with an unsegmented one and the selection reverts with "These subjects cannot pair together."
- Pick the papers that count together under Pair Combination.
- Enter the Pass Marks for that combination. This is the combined pass mark, checked against the members' marks added up, not against each subject on its own.
- Click Add More to commit the combination. It appears in the list below with its pass marks.
- Add more groups if you need them, then save.
A subject can only be in one group at a time. If it's already claimed, it won't appear in another group's subject list. Remove it from the first group to move it.
If you leave a group half-built you'll see "Add the selected combination with the plus button, then save." A group with no name gives "Enter a grouping name for each pair group.", and one with no subjects gives "Select at least one subject for each pair group."
Empty state on this step reads "Add a pair group to combine subjects into one result column." That's the normal state for a class with no paired subjects, and you can leave it that way.
What saving actually saves
Each step saves on its own as you pass through it. There's no single save at the end, and no undo across steps. If step 3 fails, steps 1 and 2 are already saved.
That's usually fine, but it means an interrupted setup can leave a class half-done. If you're unsure where you stopped, reopen the class from the Class Exams list and walk the three steps again. The wizard loads what's already saved.
FAQ
A class shows Not created yet. What's missing? Nobody has run this wizard for it. Click Create Class Exam, pick the class, and work through the three steps.
I saved as Draft. Can teachers enter marks? Treat draft setup as not ready. Reopen it and finish with Save & Continue so the class shows Active.
A subject is missing from step 2. The class doesn't have that subject for this term. Subject assignment isn't done in this wizard. Fix the class's subject list first, then come back.
Do I have to repeat all this for every class? Yes, each class sets its own subjects, marks, and pass marks, because those genuinely differ. What you don't have to repeat is the exam's dates, template, and policy. Those flow down unless you override them.
What happens if I change Full Marks after teachers have entered marks? Saving the step re-runs the results for every student in the class, so the reports change. Check the tabulation sheet after any mid-exam change, and tell the teachers involved.
Can I copy a class's setup to another class? There's no copy action in the wizard. Set each class up individually.
Related pages
Creating an exam and its timeline
Set up an exam for an academic session, fix its dates, pick its report template, and set the rules that decide when results can be printed.
Printing admit cards, seat plans, and other exam papers
Produce the documents you need before exam day: admit cards, seat plans, the routine, question paper covers, and blank mark sheets.