Cataloguing books and copies
Add a book title and its barcoded physical copies to inventory.
A catalogue record is a title, such as one edition of one book. A copy is the physical book on the shelf, with its own barcode and price. You catalogue the title once, then add one copy for every physical book you hold, and the screens call a copy an item.
Prerequisites
You need library access to open Library > Catalogue, add access to create a title or its copies, and administrator access to change either one later, because the two edit screens are currently open to administrators only. Set up the four reference lists first, because Item Type is required before a title will save.
Finding a book in the catalogue
Open Library > Catalogue. The list shows one row per title, with the columns SL, Title (the author shows underneath the title), Edition, Series, ISBN, Publications, Created By, and Copy. The Copy column is the number of physical copies you hold for that title. The row menu holds Edit and View.
Type in the Search box to match a title, an author, or an ISBN. Nothing else is searched.
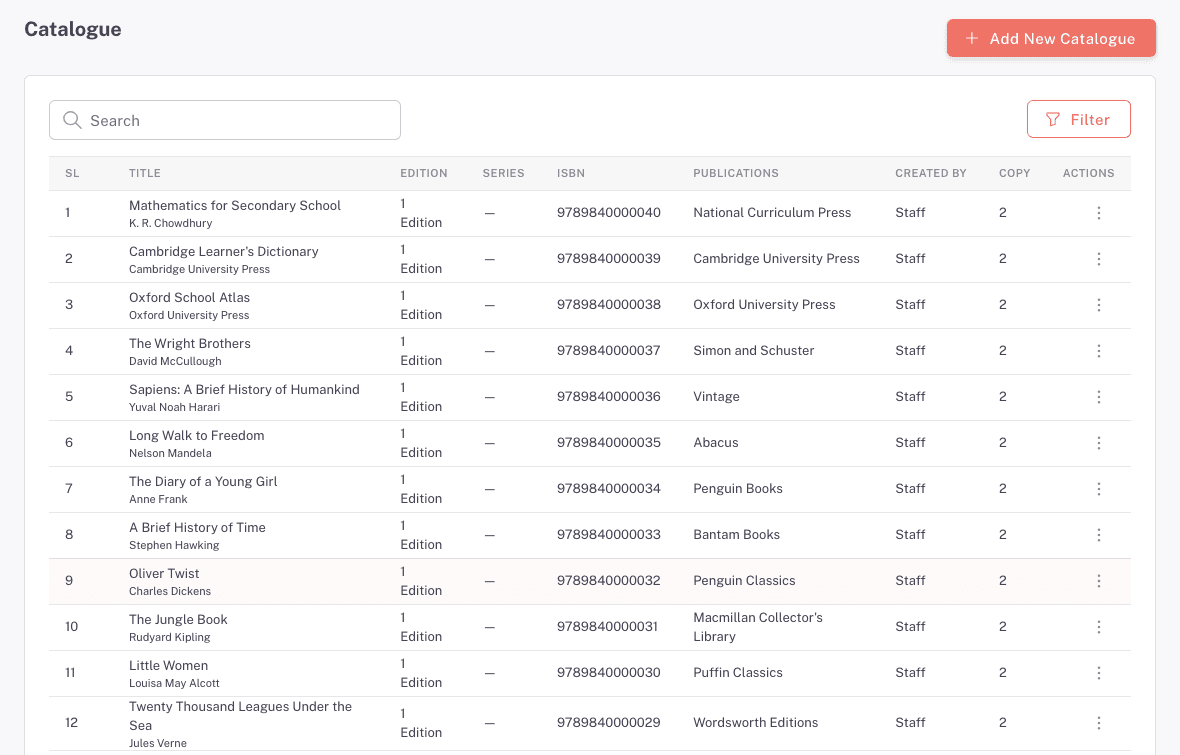
Press Filter for the drawer, which holds Barcode, Series, Genre, and Item Type. The four are independent, so picking a Series does not narrow the Genre list. The drawer holds your changes until you press Filter, and Cancel leaves the list as it was. Everything you apply shows as a chip above the table, so you can drop one filter at a time or press Reset to clear them all.
Adding a book title
- Press Add New Catalogue at the top of the catalogue list.
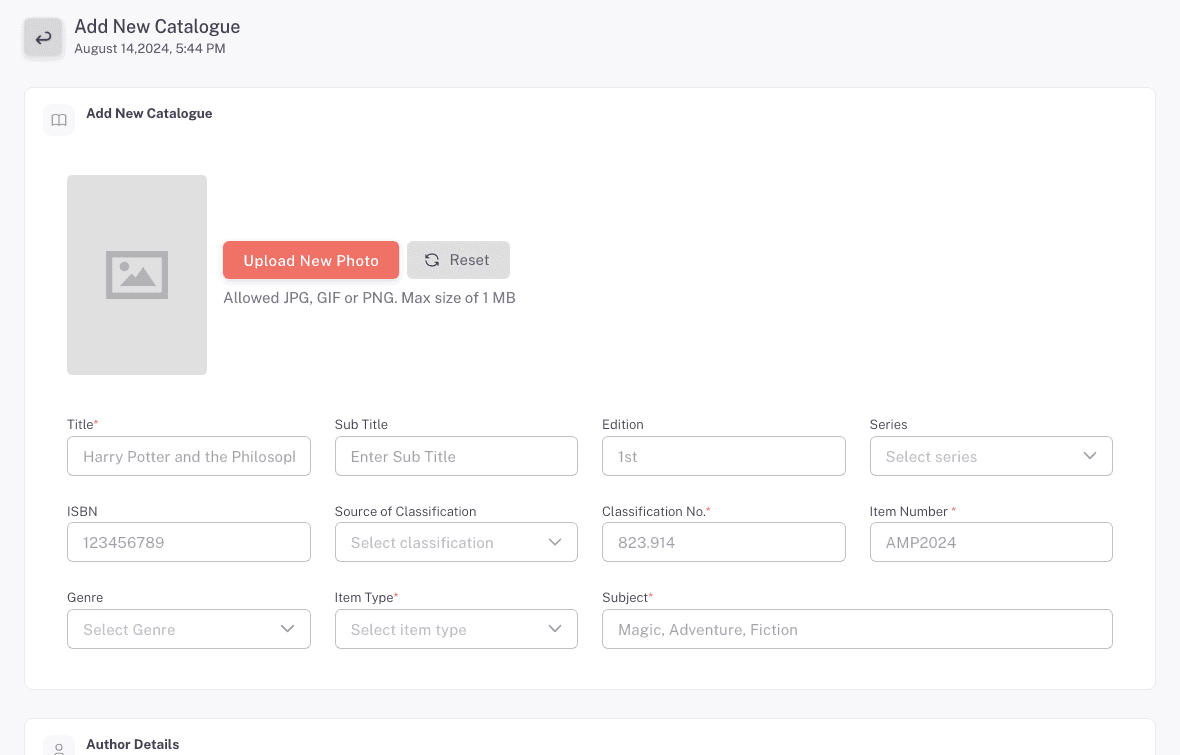
- Press Upload new photo to add a cover. The file must be JPG, GIF, or PNG, and 1 MB or smaller. Reset puts the placeholder cover back.
- Fill the Add New Catalogue card: Title, Sub Title, Edition, Series, ISBN, Source of Classification, Classification No., Item Number, Genre, Item Type, and Subject.
- Fill Author Details with Author and Corporate Author.
- Fill Physical Details with Pages, Other Physical Details, Dimensions, and Weight.
- Fill Publications with Place of Publication, Name of Publisher, and Year of Publication.
- Fill Electronic Location and Access with Host Name and Uniform Resource Identifier(URL) if the book has an online edition.
- Fill Others with Damage Fee first, then Lost Fee.
- Write anything a colleague should know in Summary.
- Press Save & Continue.
You'll see "Catalogue added successfully", and the screen moves straight on to Add New Item so you can add this title's copies.
Which fields actually block the save
The red asterisks on this form are not a reliable guide. The fields that stop the save are Title, Classification No., Item Number, Item Type, Subject, Pages, Dimensions, Damage Fee, and Lost Fee. If Save & Continue does nothing, scroll back through those nine fields.
Check Title first. It carries an asterisk, but the form itself does not catch an empty one. The form accepts the blank, the save is then refused, and no field turns red, so a missing Title is the most common reason a save looks like it did nothing.
Damage Fee and Lost Fee
Type Damage Fee before Lost Fee. Typing a Damage Fee copies the same number into Lost Fee, so filling Lost Fee first loses your value.
FEMS stores both amounts on the title but never charges either one on its own. When a copy comes back damaged or missing, the librarian types the amount into Additional Fine on the return screen. Treat these two fields as your own note about what to charge, not as a rule the system applies.
Adding copies
The Add New Item screen opens on its own after you save a title. You can also reach it later from Add New Item on the book's detail page.
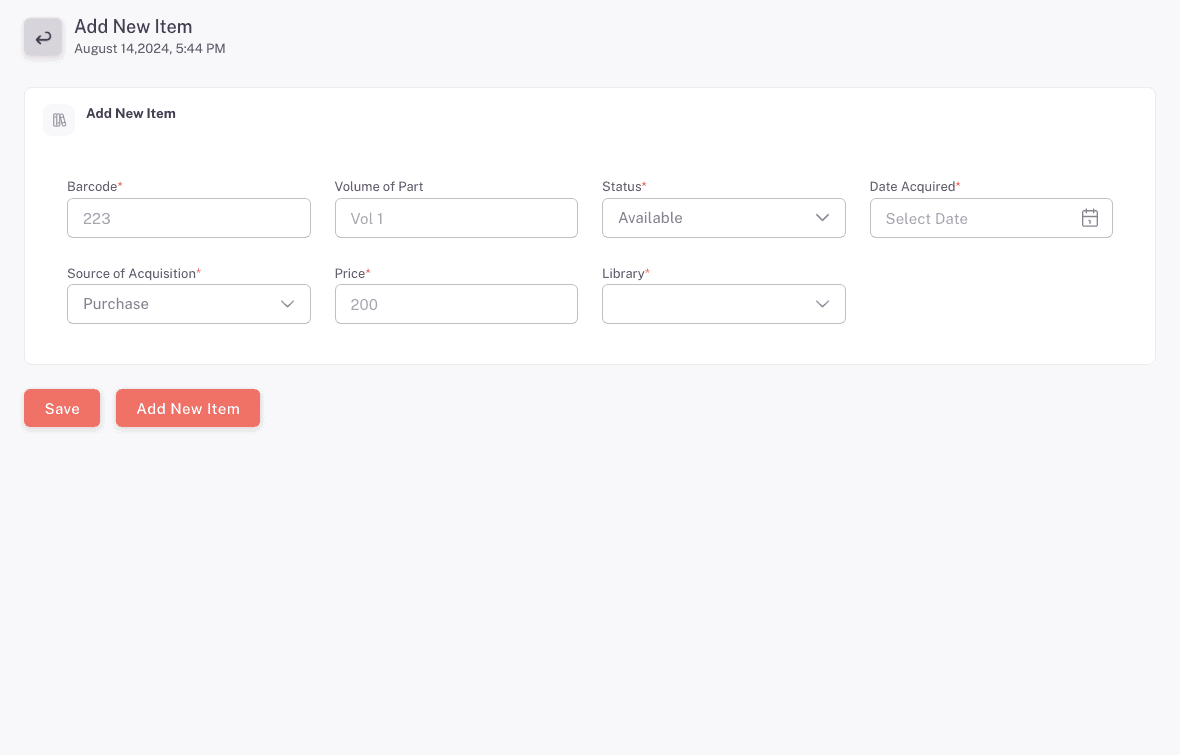
- Type or scan the copy's Barcode.
- Type a Volume of Part if the copy is one volume of a set. This is the only field you can leave empty.
- Pick a Status. The choices are Available, Not Available, Damaged, and Lost, and a new copy starts as Available.
- Pick a Date Acquired.
- Pick a Source of Acquisition.
- Type the copy's Price.
- Pick the Library that holds the copy.
- Press Add New Item to open another block for a second copy, and use the red remove button on any block after the first to drop it.
- Press Save.
You'll see "Items added successfully" and land on the book's detail page.
Do not pick Lost as a status
Lost sits in the Status list on both Add New Item and Edit Book Copy, and saving it is refused on both. The message you get back names status numbers rather than the words you picked from, so on the add screen it reads as a save that failed for no reason.
Leave a copy on one of the other three statuses here. Record a lost copy through the return screen instead, where you set the return status to Lost.
Check a barcode before you reuse it
Barcode checking on this screen is narrow. When you add copies here, FEMS only compares the barcodes inside this one submission against each other. It does not compare them against the barcodes already in your library, so a duplicate saves with no warning. Editing a single copy later does check the whole library, which is why the same barcode can be refused there and accepted here.
A duplicate barcode causes trouble at the issue desk: scanning it finds one of the two copies, and not always the one in the borrower's hand. Search the catalogue for a barcode before you reuse it, including barcodes from books you withdrew.
You never type a Call Number. FEMS builds it from the title's Classification No. and Item Number.
Reviewing a book and its copies
Choose View on a catalogue row to open View Catalogue. The top of the page lists what you catalogued: Title, Sub Title, Author(s), Edition, Series, Genre, Publication Place, Publisher, Publication Year, Page, Physical Description, Dimensions, Weight, Online Resource, ISBN, DDC Classification No, Item Number, Summary, and Subjects. A field you left empty is left off the page.
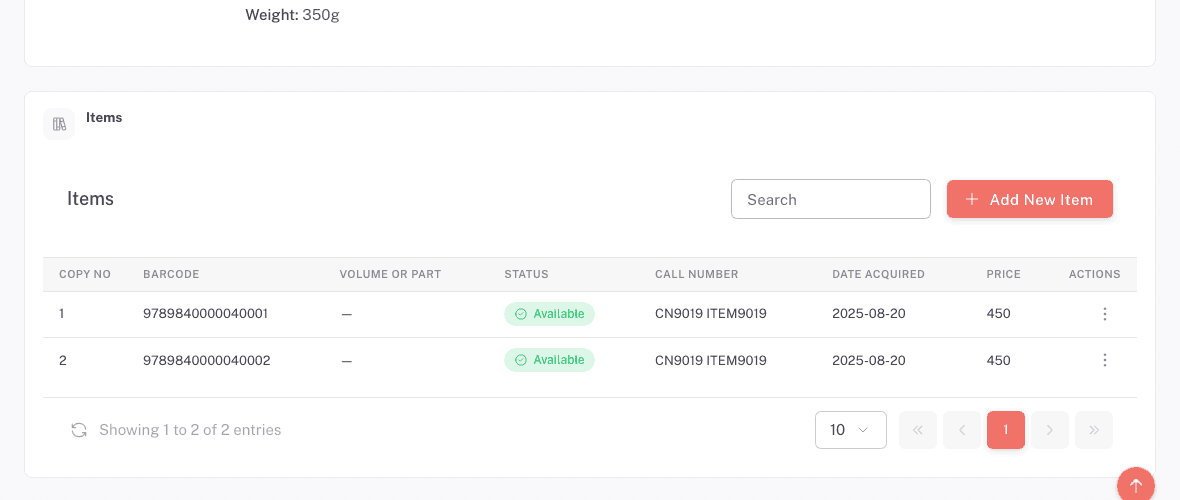
Below that, the Items card lists every copy with Copy No, Barcode, Volume or Part, Status, Call Number, Date Acquired, and Price. Status shows as Available, Not Available, Damaged, or Lost. Read Not Available as "not on the shelf": a copy out on loan carries that chip, and so does one returned damaged. Use the Catalogue Report when you need to know which. The Search box on this card narrows the copies already listed, and Add New Item adds more.
Editing a title or a copy
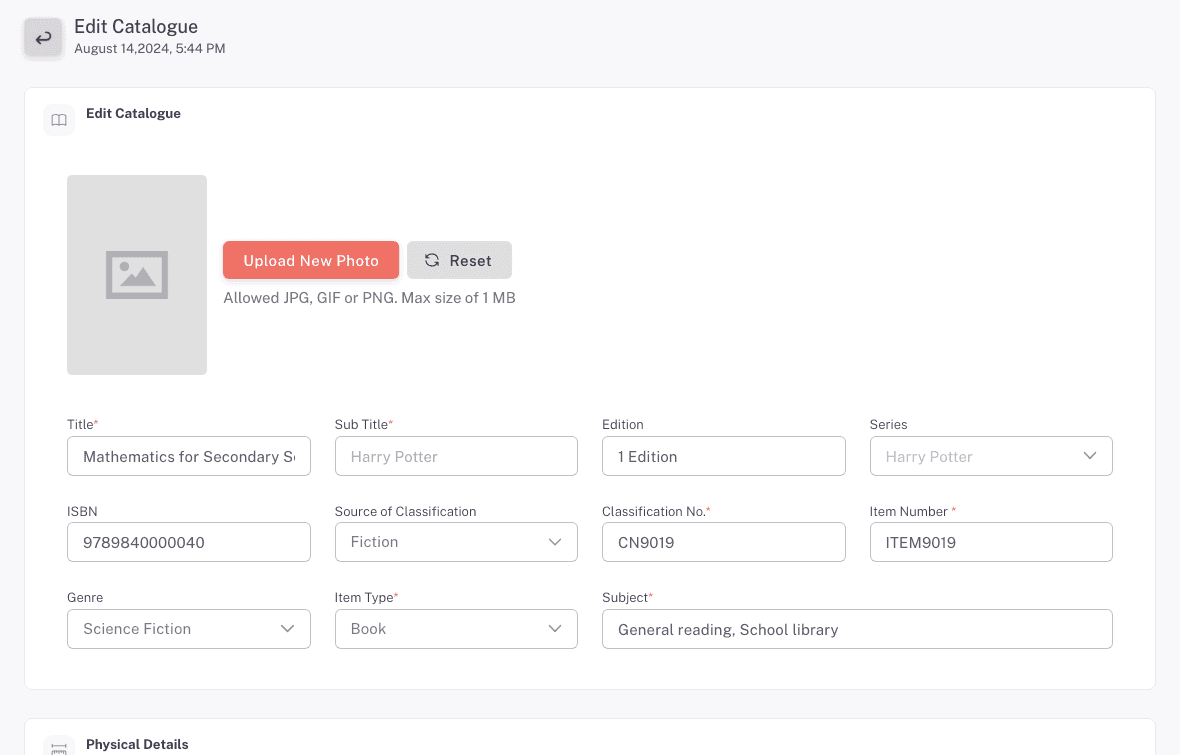
Choose Edit on a catalogue row, or press Edit under the cover on View Catalogue, to open Edit Catalogue. To change one copy, choose Edit on its row in the Items card, which opens Edit Book Copy.
Only an administrator can open these two screens today. Every other librarian lands on a "not authorized" page, even one who holds catalogue edit access. Both screens check for an access name that does not exist, so the check can never pass. This is a known fault in FEMS, not a gap in what you were granted, and asking your administrator to grant you something will not clear it. It is also why the Edit button shows on the catalogue row and then dead-ends. Until it is fixed, hand the change to an administrator.
Re-pick four boxes every time you edit a title. On Edit Catalogue, the Series, Source of Classification, Genre, and Item Type boxes do not load the book's saved values. They show the first option in each list, whatever the book actually has. If you save without touching them, those four values are overwritten with the first option. This is not something you did wrong, and there is no warning. Set all four to the right values, then press Save & Continue.
One more thing to know about copies: Source of Acquisition does not offer the same list on both screens. Purchase and Donation mean the same thing on the add screen and the edit screen. The third and fourth choices do not, so re-read the list before you pick.
Lost is refused here too. See Do not pick Lost as a status above.
Troubleshooting
The save button does nothing and no field looks wrong
One of the nine fields that block the save is empty, and the asterisks do not mark all of them. Check Title first, then Classification No., Item Number, Item Type, Subject, Pages, Dimensions, Damage Fee, and Lost Fee.
The barcode is already in use
Another copy already carries it. Search the catalogue for that barcode, find the copy holding it, and give the new copy a barcode of its own.
The edit screen shows the wrong series or genre
Edit Catalogue does not load the saved values into Series, Source of Classification, Genre, and Item Type. Set all four before you save. If a save already overwrote them, open the screen again, set the right values, and save once more.
Everything else lives on Fixing common library problems.
FAQ
Do I add a new catalogue record for a second copy of the same book? No. Open the title you already catalogued and press Add New Item. One catalogue record holds as many copies as you own.
Where does the call number come from? FEMS builds it from the title's Classification No. and Item Number. There is no field to type it in.
Can I reuse a barcode from a book we withdrew? Search the catalogue for that barcode first. Add New Item does not check it against the rest of the library, so a duplicate saves quietly and then finds the wrong copy at the issue desk.
What is the difference between Not Available and Damaged? On a book's detail page, a copy that is out on loan shows as Not Available, so most Not Available chips you see are copies someone has borrowed. The same chip also covers a copy that came back damaged. The Damaged label exists on that page but nothing in FEMS sets a copy to it. To tell an on-loan copy from a damaged one, open the Catalogue Report, whose Status column separates Available, On Loan, Damaged, and Lost.
Will FEMS charge the damage fee automatically? No. Damage Fee and Lost Fee are stored on the title as a reference for you. At return time the librarian types the amount into Additional Fine.