Logging enquiries and applications
Record a walk-in or online enquiry/application and collect the form fee.
Every admission starts here. You log a family as either an enquiry or a full application, then collect the admission form fee so the applicant can sit the entrance test.
Prerequisites
Admission office staff. The class you're admitting into needs an Admission Form Sell fee configured, and the academic year you pick needs a current session. See Setting up admission form and admission fees.
Enquiry or application: which to log
FEMS shows these as two application types. Treat them as separate workflows until the type-switch path has been verified end to end.
- An Enquiry captures a family who is asking about admission. It records the child's basic details and a contact person to follow up with. Use it for phone and walk-in enquiries.
- An Admission is the full application: date of birth, address, siblings, and guardians. Only an application can go on to the entrance test.
When an enquiry becomes serious, create a full Admission application and enter its required details. Do not rely on editing an enquiry to convert it in place until the conversion path is verified.
Logging a new enquiry or application
- In the sidebar, open Admission, then Applicant Management.
- Click New Application.
- Under Application Type, pick Enquiry or Admission. The matching form appears below.
- Fill in the form (see the two sections that follow).
- Click Save enquiry or Save application.
You'll see a confirmation that the applicant was created, and the new record appears in the Applications list.
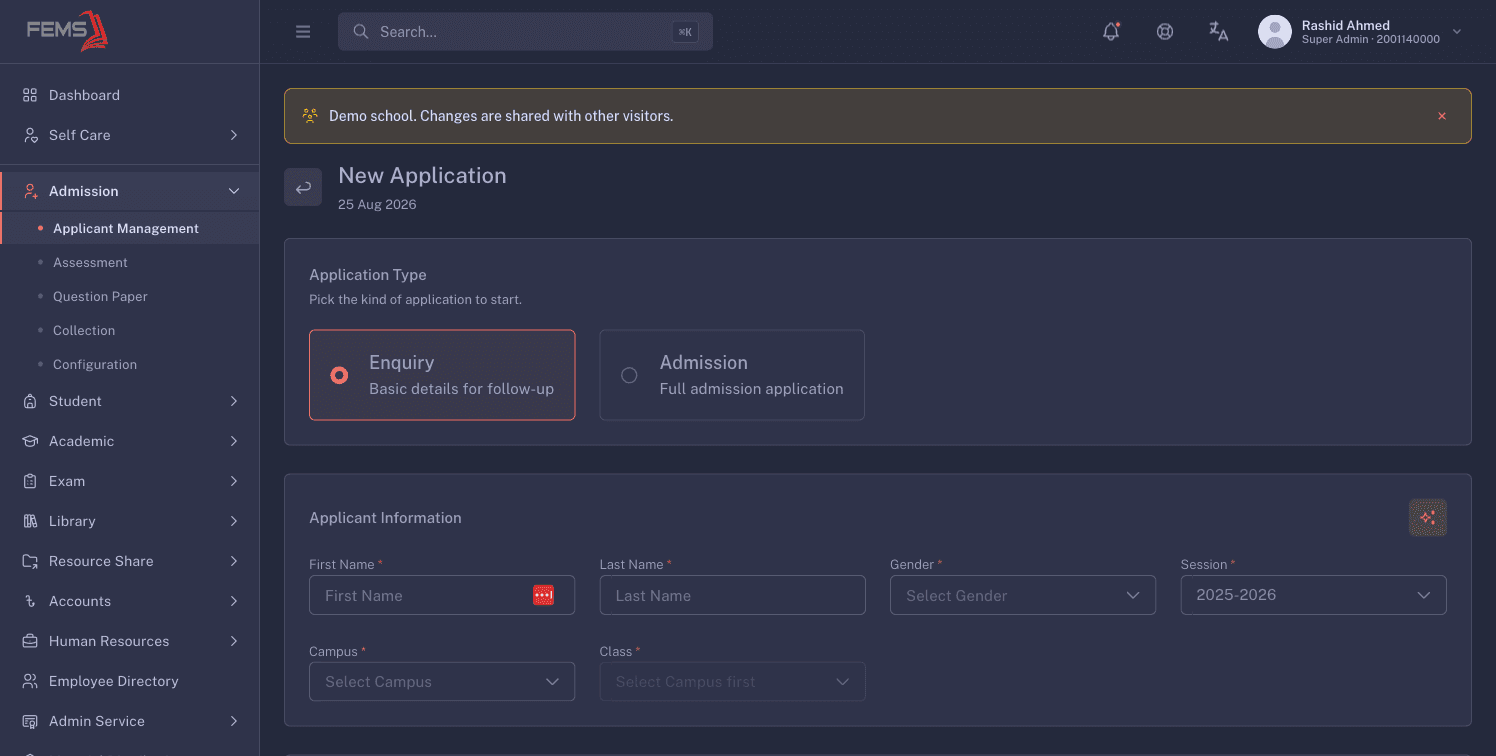
The enquiry form
Four short sections:
- Applicant Information: First Name, Last Name, Gender, Session, Campus, and Class. Class stays disabled until you pick a campus.
- Enquiry Contact: the person to follow up with. Relationship Type, First Name, Mobile Number are required. Last Name and Email are optional.
- How You Found Us: where the family heard about the school, plus an optional note.
- A free-text Note box for anything else.
The admission form
Longer, because this record becomes the student record later:
- Applicant Information: adds optional Date Of Birth, Shift, and Previous School fields. Future birth dates are blocked when a date is entered.
- Sibling Information: set Any Sibling ? to Yes to search existing students by name or ID. Picking a sibling fills in their name, class, section, and roll.
- Present Address: Division, District, Thana, Post Code, and Address Line are optional.
- Guardians: a block per guardian, starting with Father's Info and Mother's Info. Each needs a NID (National ID number), name, and Mobile Number. Click Add More for an additional guardian.
- How You Found Us and a Note box.
Two guardian details matter later:
- Typing 10 or more characters into NID looks up an existing guardian and fills in the rest of the block for you.
- The SMS Contact switch decides which guardian receives the admission payment link by SMS. Only one guardian can hold it. If no guardian has a mobile number, the payment link cannot be sent at all.
Collecting the admission form fee
The form fee is what buys the admission form. Until it's collected, you cannot generate an admit card.
- Open the applicant from the Applications list.
- In the Admission Form Payment Collection panel, pick a Payment Method: Cash or POS (card machine). POS needs a Reference ID.
- Type the Form Serial Number. It has to be unique, so take the next number from your office's serial book rather than making one up.
- Check the Amount. It comes from the fee configuration and you cannot change it.
- Click Submit, then Confirm.
You'll see a payment confirmation, and the applicant's progress moves from Applicant Register to Admission Form.
The payment is recorded as Pending at this point, not collected. It stays that way until someone settles it on the Collection screen below. The admit card does not wait for that, so this is a bookkeeping step rather than a blocker.
Settling form fees on the Collection screen
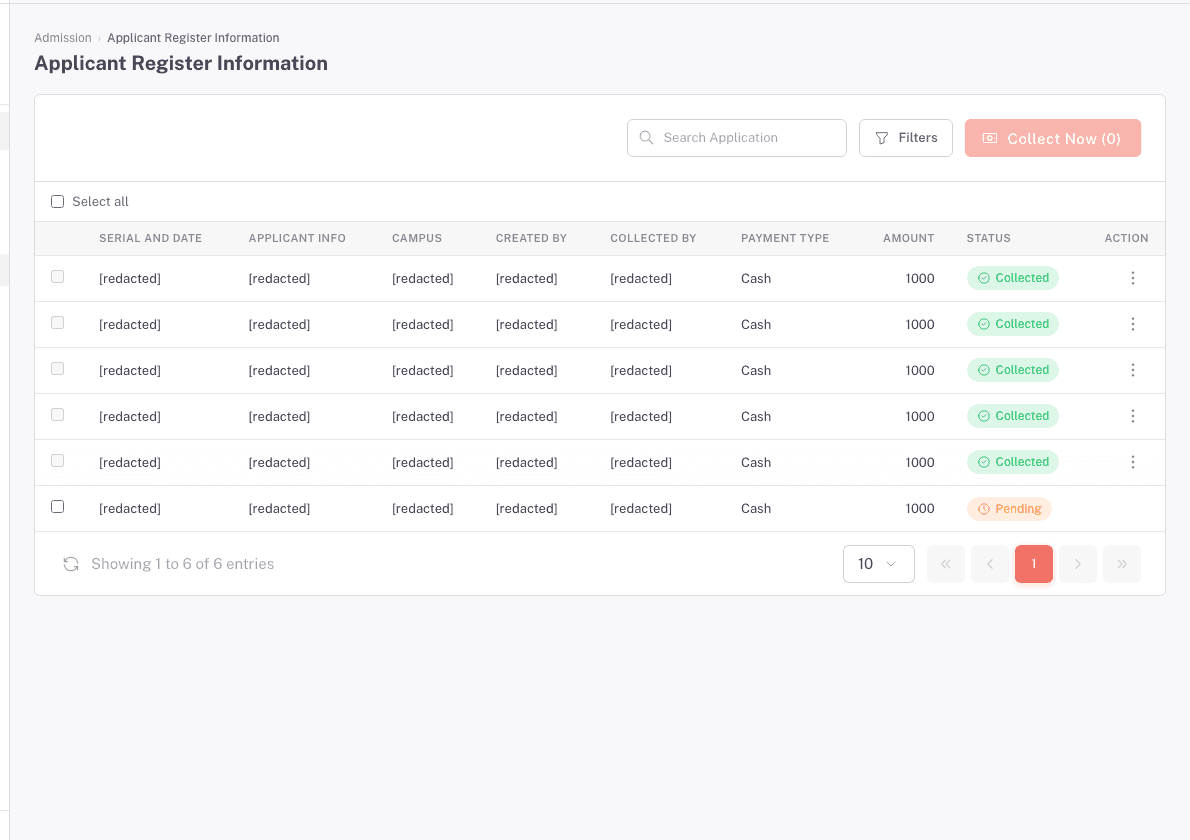
Recording a form fee on the applicant's page marks it Pending. The Collection screen is where those pending payments are settled and marked Collected, in batches.
- In the sidebar, open Admission, then Collection.
- Narrow the list with Session, Campus, Class, or Created By.
- Tick the applicants you want. Rows already marked Collected cannot be ticked.
- Click Collect Now, which shows the running total, then Confirm.
- Click Print Receipt for the collection slip, or Done.
Changing the page, the filter, or the search clears your selection, so tick and collect in one go.
Tracking applications
The Applications list is the working view for the whole module.
Filters. The Filter Applications panel narrows by Date range, Outcome, Campus, Class, Application Type, and Payment Status. Click Apply filters to run them, Reset to clear. When the panel is collapsed, your active filters show as chips you can remove one at a time, or clear together with Clear all.
Statistics. The Statistics panel across the top counts Total Applicants, Present, Absent, Eligible, Disqualified, and Enrolled for a date range you pick. Hide it with Hide statistics if you'd rather see more rows.
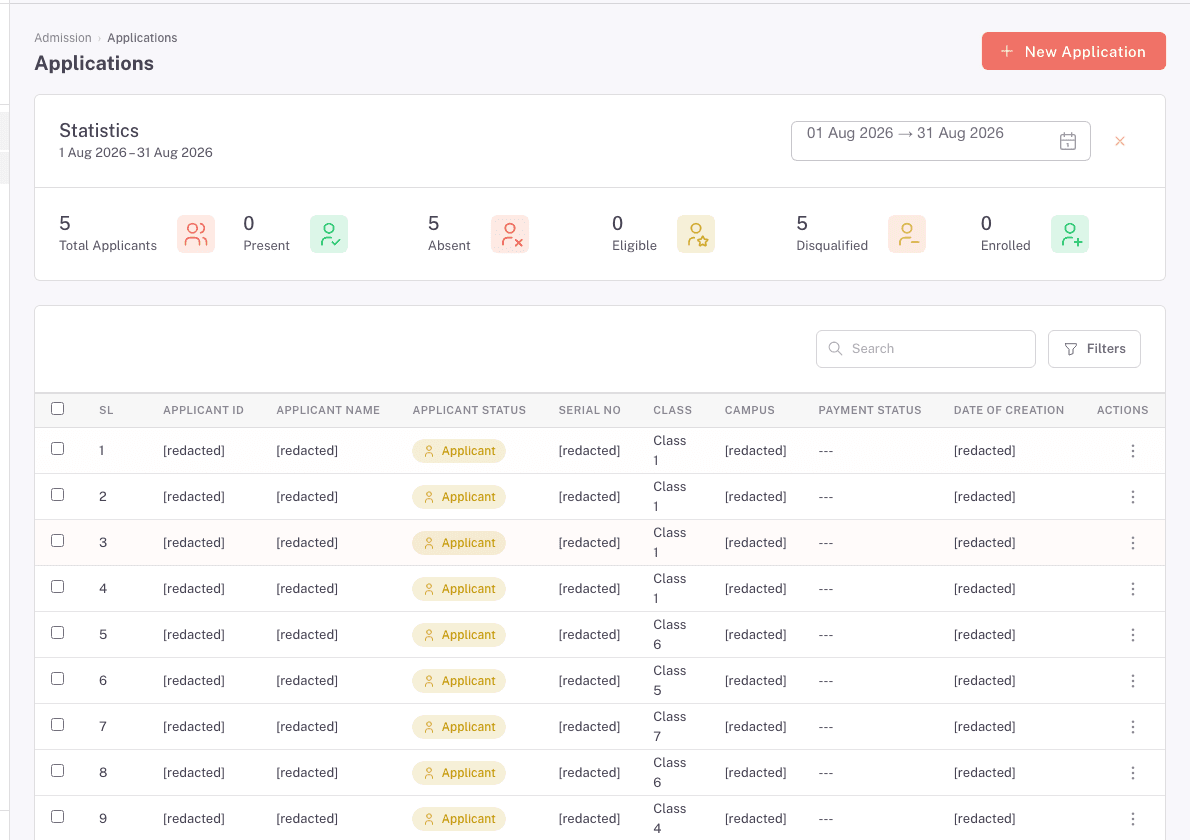
Status. The Applicant Status column shows Enquiry or Applicant. That is the record's stage, and it's a different thing from the Outcome filter, which tracks Passed, Failed, and Admitted.
Bulk actions. Ticking rows opens a bulk bar with Apply outcome and Export selected (as CSV or Excel XLSX).
Do not use Apply outcome → Admitted as a shortcut to enrolling someone. It marks the applicant enrolled and stamps today as their enrollment date, but it does not create the student record, the guardian records, or the fee invoice, and it collects no money.
Worse, it leaves the applicant stuck. Because they now count as enrolled, the real admission-fee step is blocked: the payment panel disappears from their page, and collecting the fee reports "Applicant already enrolled". You are left with someone marked admitted who has no student record and no way to get one from the admission screens.
Only collecting the admission fee on the applicant's own page creates a student.
Troubleshooting
"The selected academic year has no active current session configured." The academic year you picked has no session marked current or upcoming. An admin needs to set one up in the academic year settings, then you can save the applicant. This is the most common blocker when a new academic year opens.
"Form Serial already exists" That serial number is already on another application. Check your serial book and use the next unused number.
The check only covers applications your account can see. If your access is limited to certain campuses or classes, a serial used outside that range will not be caught here, so follow your office's serial book rather than relying on FEMS to catch every clash.
"Invalid amount or Payment not configured" One of two things. Either the class has no Admission Form Sell fee configured for that session and campus, or the amount doesn't match the configured fee exactly. Partial and over-payments are both rejected. If the Amount field shows 0, it's the missing configuration.
"Already Paid" The form fee for this applicant was already collected. Open the applicant and check the Admission Form Payment Collection panel, which shows the existing payment.
"Payment(s) not found" when collecting a batch. Some of the selected rows are outside the campuses and classes your account can see, so they drop out of the batch and report as not found rather than being collected. Ask an admin to widen your data scope, or collect those rows from an account that can see them.
XLSX export fails but CSV works.
Use CSV instead. Ask your admin to enable the ZIP extension (ext-zip) on the FEMS server.
A bulk update says some rows failed. The bulk bar reports how many rows succeeded and how many failed. The usual reasons are that the applicant is already enrolled, or that the class has no Admission Fee configured. A bulk action reporting partial success is normal, so read the count rather than assuming everything worked.
Nothing happens when I click a row. You don't have access to the applicant detail page. The row click is ignored rather than showing an error. Ask an admin for Admission access.
The whole Admission menu is missing. The Admission module isn't enabled for your account. Ask an admin.
I need to delete an applicant. You can't. FEMS has no delete for applicants, by design, since applications are financial records. Mark the outcome as Failed instead, or ask an admin what your school's practice is.
FAQ
Can a family apply online instead of at the office? FEMS has a separate public online admission form with its own applicant list and lottery selection. It's a different system from the walk-in pipeline on this page.
Can I change an enquiry into a full application? Not as a documented workflow yet. Create a full Admission application until live verification confirms that switching an existing enquiry preserves every required field. The UI exposes the type switch, but guardian details and the rest of the admission fields have not been verified through that path.
What is the Form Serial Number for? It ties the FEMS record to your paper serial book, and it has to be unique across every application. FEMS rejects a duplicate.
Why can't I edit the Amount on the payment screen? The amount comes from the fee configuration for that class, session, and campus, and it has to match exactly. If it's wrong, fix the configuration.
Which guardian gets the payment link SMS? The guardian with the SMS Contact switch turned on. If none is set, FEMS uses the first guardian who has a mobile number, in the order father, mother, then others.
Does the applicant get a student ID at this point? No. A student record and student ID are created only when the admission fee is collected after a passing test.